
This time last year, I did quite a full 'front of house makeover'. I painted the door and I got up on a very high ladder and painted around the windows too. The house went from hugely discoloured red to clean white with a punchy dark blue door. But one thing I failed to update was the house sign. And over the last few frosty months - it took a bit of beating and completely fell apart. We needed a new one ASAP.

See what I mean?! So when Village Green Signs got in touch and asked if I wanted one of their signs, not only was the timing perfect, but it was also exactly the kind of thing I had been imagining for the front of our house too. Their signs are traditional-styled and look just like the old cast iron ones; but made from a far more durable resin material. Each sign is bespoke made in a traditional handcrafted kinda way; from being hand cast to hand painted and hand finished. It means each one is unique and it's the traditional kind of craftsmanship I absolutely love. It's perfect for a period house and is a new-take on the old original. Not to mention, absolutely beautiful and hella detailed!

So this is the design I have chosen - an oval shaped sign with pink roses and a simple gold '27'. I felt the roses were quite fitting for our *way OTT* pink-roses-everywhere kinda garden. And it's also a little nod to the previous owner, who planted all those roses and lived here for 60 odd years. Not to mention of course, I thought pink would look FAB next to our dark door.

You can see just how much detail has gone into the making and painting of this sign; the leaves are made with several different greens and you can even spot some hints of yellow too. And the roses (which can't be an easy thing to paint!) are blended to perfection. It's really quite something special - and I highly recommend you take a look at some of their other designs with are even more detailed and intricate. We're talking detailed animal fur and even fabulous water scenes - some seriously stunning and skilled designs!


Pretty right? I mean, I wouldn't mind standing out at a front door waiting for it to be answered whilst staring at this. It's the kind of sign that makes a real impact and I suppose in a way, also set the standard of expectations for the interior of the house. Something I'm not sure we're *quite* living up to just yet! But give it time ;)

I love this sign so much and really wanted to share some photos of the actual production of the signs too - which I personally find really fascinating (side note - I used to love watching those 'how it's made' TV shows! Anyone else remember those?!) and shows exactly how much work, time and care goes into each sign.
The first step is to make individual templates which will be used to make a mould. As each sign is bespoke, it means a new template must be made each time. The selected motif/design and lettering/numbers are positioned onto sign of choice, and its then sprayed to ensure they wont get stuck in the mould.


Individual moulds are made from HIPS material, which is starts out as a large sheet and is set around the template.


Once the individual bespoke moulds have been made, the resin can then be poured into them and this is left to set for a couple of hours.


Each sign is then sanded and sprayed for a perfect finish before painting can begin..

And finally each sign is hand painted by in-house artists before being sealed for weatherproofing and shipped out for delivery.

From start to finish, each stage is done by hand, tailor-made to each order. It's a true work of art, which Village Green Signs have perfected since 1989! And they now have over 800+ designs with several shapes and sizes of signs available for each one. Whether you're looking for animals, flowers, trees, cars, dragons or even bagpuss (yep, the cat!) - there's literally something for everyone and every house. And they also do special commissions too if you're looking for something really unique! I have to say - it took me quite a while to finally pick a design, since there really are so many incredible options to choose from and I very nearly almost went for one with a Cavalier King Charles Spaniel on, at one point!
So, if you want to treat yourself, a friend or family member (or perhaps just give the house a good treat!) to one of these gorgeous house signs, then please do check out Village Green and their wondrous selection of designs. I promise, you will not be disappointed!!

*I was gifted a house plaque to feature in this post. Thanks for supporting the brands who support this blog!
from http://www.kezzabeth.co.uk/2018/03/traditional-handcrafted-house-signs-village-green.html
0 Comments
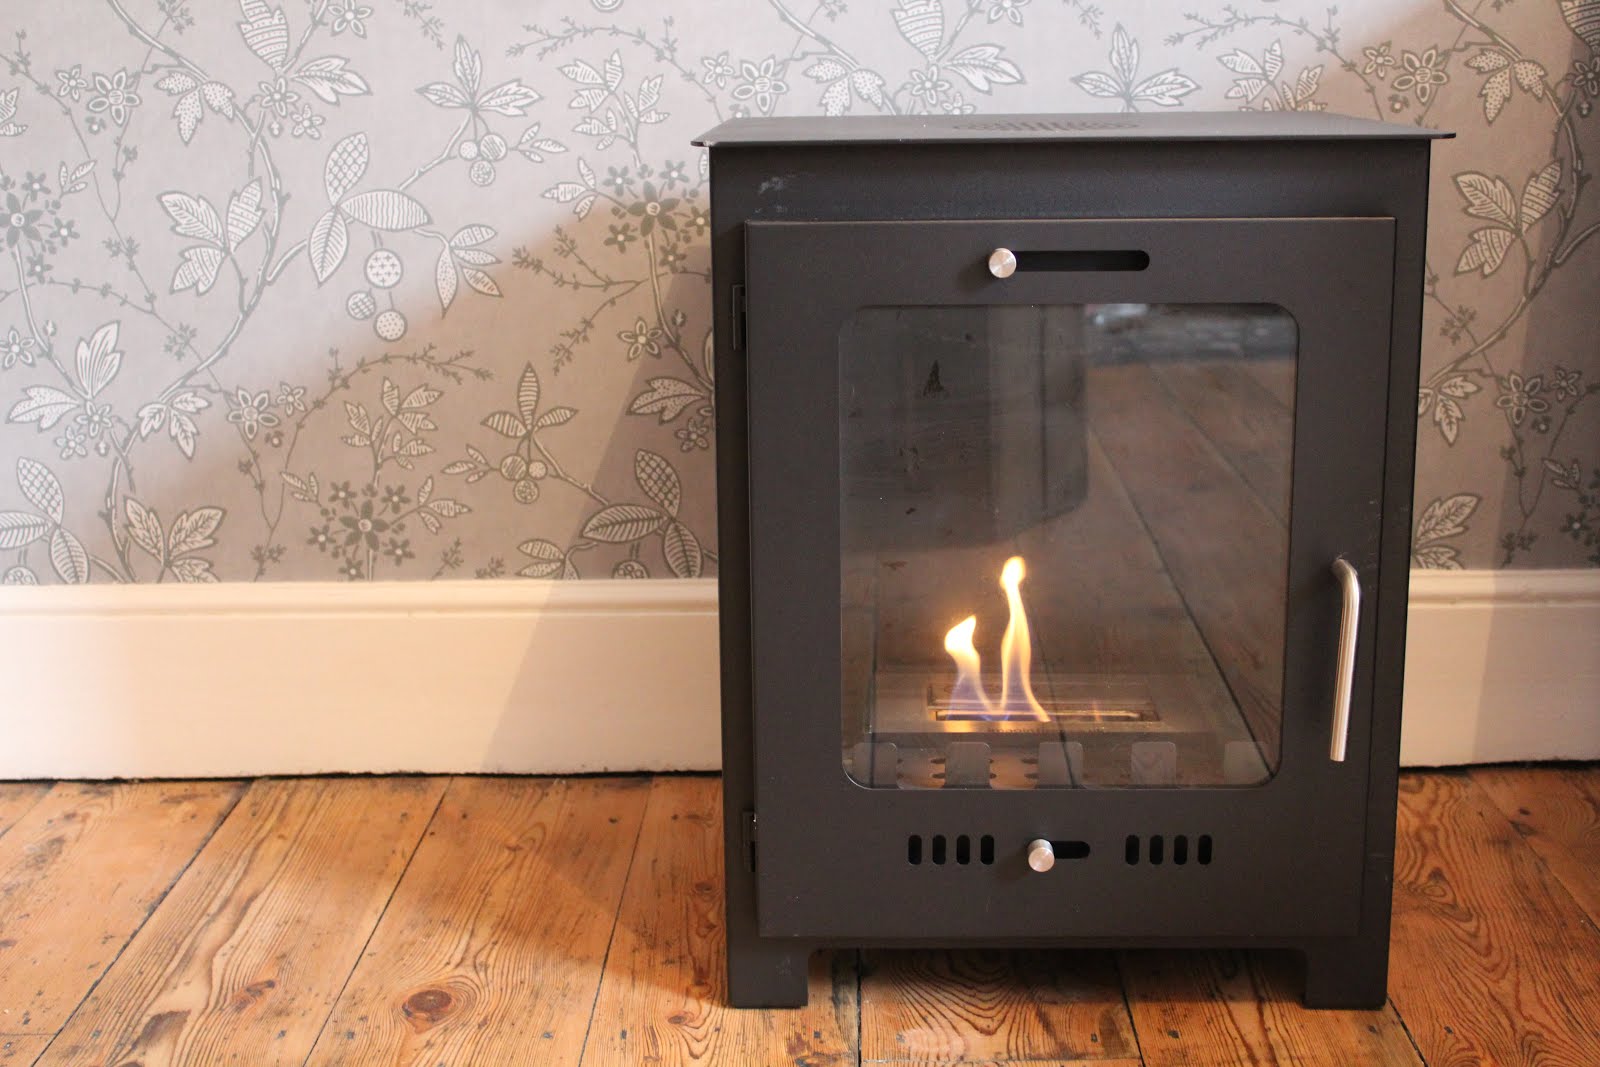
You guys know how much I love my wood burning stove in the dining room. It's aaaaaa-mazing. However, it was bloody darn expensive. We're talking four figures. There's the cost of the stove, the cost of the flue, the cost of all the little bits like a register plate and chimney cowel and then there's the cost of having it all fitted. Which is no easy DIY when it involves carrying a 9m length of steel flue all the way up some ladders and onto your roof. Even for us, that was a stretch too far. The whole thing, was expensive.
However, there is a much much cheaper easier alternative - a bioethanol fire. Say what now, I hear you ask? Bioethanol. It's a kind of liquid that burns a smokeless fire. You don't need a chimney. You don't need a flue. You don't need a hearth. In fact, you don't to pay for any kind of installation. And yet, you still get the beauty of a real fire, heat and it even looks like a real wood burner, don't you think?!
What Is Bioethanol?
OK let's start at the beginning. Ethanol is a bi-product made from the fermentation of sugars from plants. It's considered a renewable fuel and is carbon neutral. It's much more environmentally friendly than its similar fuel alternatives, which makes it the greener choice and it also burns cleanly. Ethanol is essentially a fluid and it comes in a bottle.

How Does It Work?
It's ever-so-complicated (not) - you pour the liquid into the 'firebox' inside the wood style burner. You leave it to soak up for a couple of minutes, then light a match and voila, fire.


Initially it burns a very low blue flame and then after a couple of minutes it gets a little stronger and gives out a much more orange flame, like any other real fire. There is honestly no smoke, no soot or ash; just fire. It means you don't have to clean the glass, you don't have ash falling out the door and you don't need a chimney or flue. But it is a real fire.


You can adjust the output of the flame and heat by adjusting how open the firebox is. If you want to 'switch it off' so to speak, you just close it up. You don't need to wait for it to burn through and you don't need to constantly 'add fuel' (like you would with logs) which means you can leave the room and come back an hour later to it still being lit. It's fuss-free, doesn't require constant watching and it's completely safe and meets all European Standards for Fireplaces.
So, I was sent this stove from ImaginFires to try out and review for the blog, which I've been doing for the last few weeks. If you're interested in bioethanol fires - I highly recommend checking them out as they sell all kinds of bioethanol fires, from freestanding fire baskets, to victorian style fireplaces to even wood-burning stove ones, like the one I'm reviewing. Main Benefits Aside from being literally so easy to use (no kindling or faffing required!) - the main benefit in my eyes is the zero installation. Literally, you take it out the box, put it into position and can light it straight away. The fact that it can go absolutely anywhere is fab too. A corner in the kitchen, conservatory, bedroom - anywhere and on any floor type; you don't need a hearth, unlike an actual log burner. That means huge savings when compared to a real wood-burner, or even a gas or electric one. There's nothing more to spend, other than on the product itself - which by the way, at £399 for this particular model is rather affordable! The fact you don't need a chimney also opens it up to being used in any house too, not just period ones. So if you have a new build without a chimney - no problem! And if you live in a smoke controlled area, that's also no problem - 'cos there ain't no smoke. It's much more environmentally friendly than typical wood-burning stoves too. 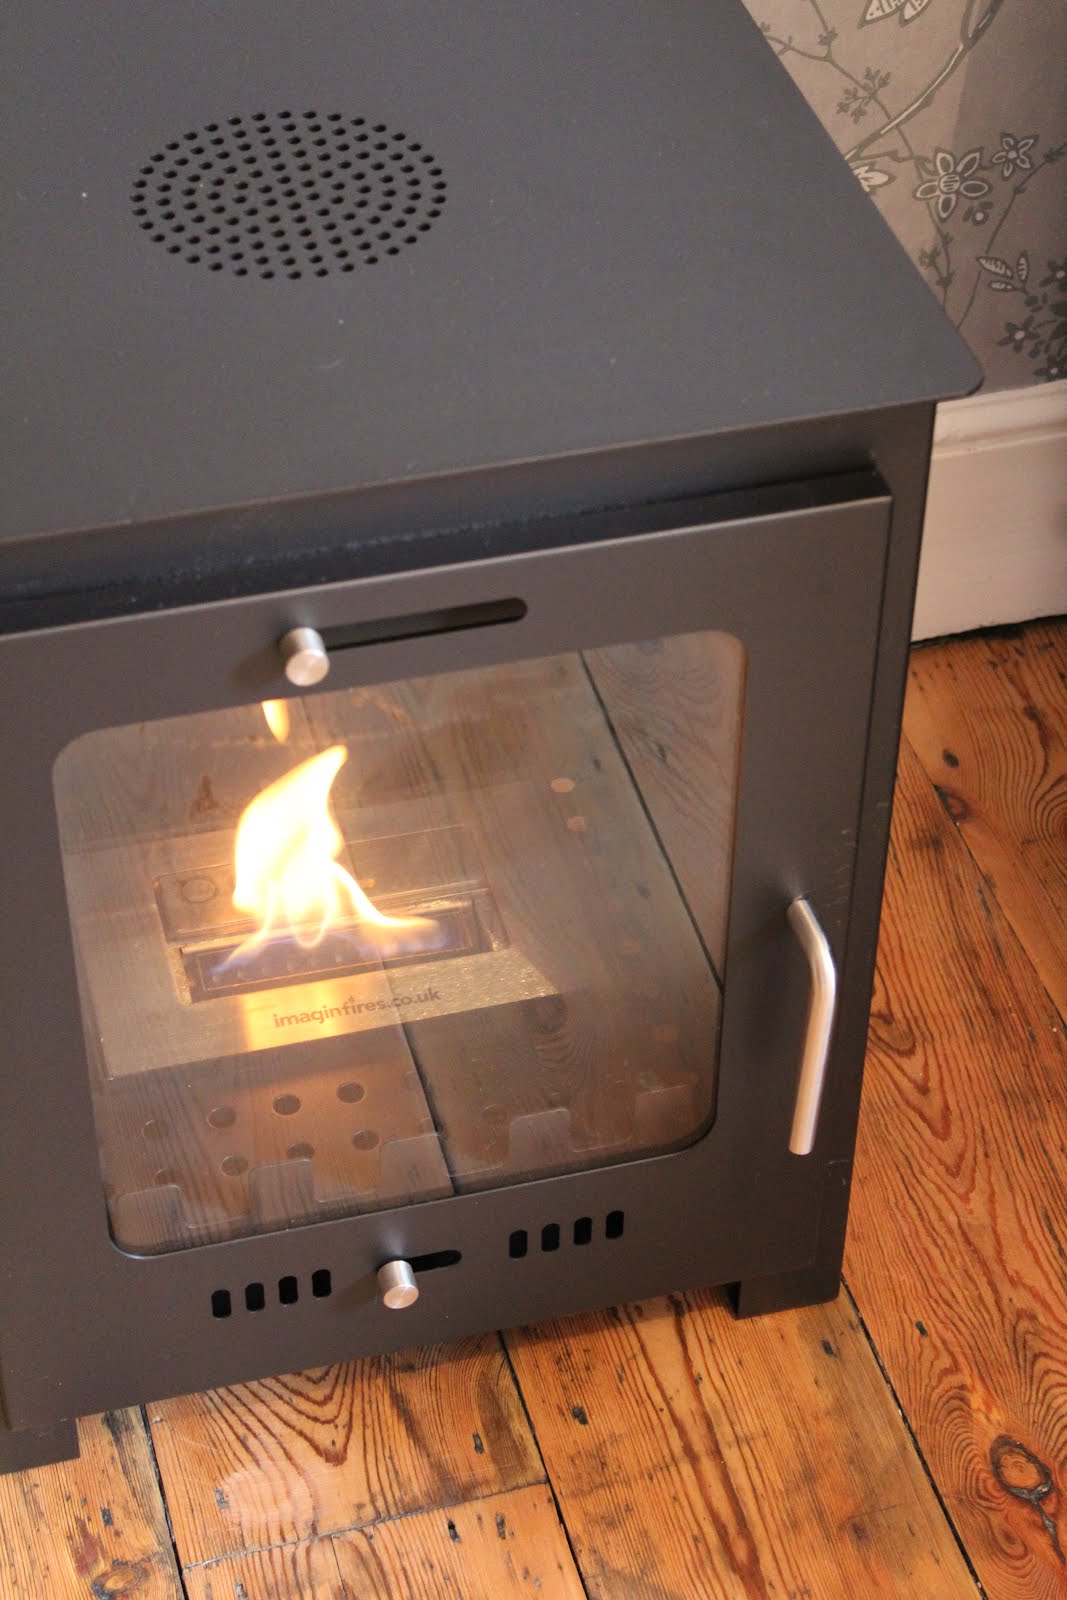
The fact that you get a real fire is amazing. It's not a simulation, it's completely real and has all the natural ambiance that we all love about fires. It's just as mesmerising to watch and feels just as romantic/cosy when lit. It's the real deal for a fraction of the price! My only slight negative about it, is that burning bioethanol does a slightly more chemical-y kind of smell. It's not quite chemical, but you definitely don't get that wood roasting smell like you do with a real wood-burner and it's not quite odour-less. That being said, there are scented ethanol options which I'd like to try out. And there's also faux logs to can use to simulate the effect of logs burning - again, I'd be pretty keen to try that out as well! How Much Heat Does It Produce?
In terms of heat output, this particular stove burns at 3KW, which is higher output than most electric radiators or heaters. In comparison to a real log-burner, a small one would typically have an output of 5KW - so it's really not too far away from that. Obviously how well it heats a room will depend on different factors (room size, insulation etc) but we've been trialling it around different rooms in the house over the last few weeks to see just how well it can heat up a room, without central heating (which we don't have!).
Our smallest bedroom was a great success and it literally made it nice and toasty within an hour of burning, even without central heating. Our giant kitchen-diner, not quite so much, although it's quite a sizeable room! And our medium-ish living room was a kind of middle-of-the-road meeting between the two. It definitely noticeably heated up the room, however due to our very draughty windows, I do think it had a bit of battle on some of the windier days. On non-windy days though, it was really fab! So my hope is once we've fixed the draught - it'll be almost as toasty as the spare bedroom all the time. Which would be amazing! Bioethanol fires definitely aren't designed to be a replacement for central heating - more of a top-up heat to a particular room. 
What About Running Costs?
We've been using half a bottle of ethanol each time we've lit a fire and it's lasted around 3.5hours each time, burning with the firebox fully open. A bottle of ethanol costs £2.50 so for each burn we've used £1.25 of fuel. A half-opened firebox would obviously burn for longer but provide a lesser heat output. I think for 3.5hours of decent heat and the luxury of a real flame - £1.25 is pretty good going! You can also get scented ethanol as I mentioned, which costs a little more - but provides a bit more of an aroma whilst it burns. There's a 'forest' scented one which I'm pretty keen to try out! 
Would I recommend?!
I honestly think it's fab - a really great affordable alternative to a real wood burner and one that honestly looks the part too. We'll be putting this into our chimney opening once we've patched it all back up. But the great thing? We've already been using it, just positioned in different corners of the room.
This stove is the Malvern Black and currently retails at £399 but there also cheaper/more expensive models available depending on what kind of style you're into (including fire baskets and full fireplaces too!). Bearing in mind, you don't need to pay for a hearth, or installation of a flue - you're saving yourself around £1500 buying a bioethanol fuel burner over a real wood burner. If that's not one of the most compelling reasons to choose this over a real wood-burner - I don't know what is.
I love it and I've already recommended it to people personally. What do you think to it? Would you consider a bioethanol stove? *I received the stove featured in this post, in return for a review. All words and opinions are my own. Thank you for supporting the brands who support this blog! from http://www.kezzabeth.co.uk/2018/03/bioethanol-wood-burner-review.html 
I've been busying myself over the last few weeks with our living room renovation - getting the walls prepped, the ceiling pepped, opening up the fireplace, sanding floorboards (post on that coming soon!) and finally - we're at the painting and decorating stage. I think this is probably the quickest makeover I've ever done - talk about girl on a mission!
So, this post is in collaboration with Little Greene, who have recently launched a new range of absolutely gorgeous wallpaper; Archive Trails II. I have been incredibly fortunate and as part of this collaboration, I was able to choose and feature one of those wallpapers in our living room. And I can't tell you how much I love Little Greene wallpapers, so I am thrilled to pieces to be working with them!
First things first though - here's a quick look at the living room pre-decorating. If you'd like to see a full room tour of the 'before' then please do check out this post. But it certainly looks a little different from how it did four weeks ago though, doesn't it?!


Decorating is my most favourite kind of DIY. I love painting - always have, always will. And it's this stage that totally transforms a room. Like totally. Paint is the best thing since sliced bread and can change the feel of a room in an instant. From giving a room a fun and young feel, to rich and regal - it can literally do it all. I gave this room a really quick white-wash a few weeks back, just to keep my sanity so I didn't have to stare at those horrible green patches for too long - But the actual paint I've decided to go for in this room, is a very light grey; a sophisticated, gentle grey. One that's warm in tone and feels really cosy in the room. It's the colour 'French Grey' by Little Greene in their Absolute Matt finish.


I've never used Little Greene's paint before, but I can now honestly say the coverage of it is exceptional. It's quite thick and a little really does go a long way. I only had a 2.5L tin to do three (large!) walls in this room, which I would usually have bought a 5L tub for. To say I was worried it wouldn't stretch is an understatement - but it did! After two walls, I still had just over half a tin left. And I think that's really good going!
I also really like the fact their paints are eco friendly. They're water based with almost no VOC content which makes them odourless and of course, they don't add to pollution in the atmosphere. They also have 40% more pigment than oridinary paints which provides a greater depth of colour, which you can pick up in different lights. And of course, lots of their paints (and wallpapers!) are based on historic colours and finds, which makes them perfect for period houses like ours.


I always do one full coat of paint and then patch up any imperfections in the wall. I know this might seem a little backwards but you can never really see every little minor imperfection on a wall until it's one flat colour - so the paint helps to show these up. I have however already repaired the majority of the bigger imperfections before painting (you can read about patching old walls here) but the imperfections the paint helps to show up are usually are little holes or little scuffs in the plaster. You might not be as fussy as I am, but I quite like to cover these up for a perfect finish.

When it came to the skirting and the cornicing, I decided to keep it simple and white. I used Zinsser BIN primer on both first and then used a white trade matt emulsion on the cornicing (the same as the ceiling). The skirting will have a white eggshell on it eventually, although I've currently left it primed for the time being.

To get a really crisp line between both the skirting and the cornicing, I've used Tesa Tape (which is a kind of masking tape) in their precision sensitive variety. I know lots of people have problems with masking tape pulling paint off the walls - but this one is very gentle and isn't very sticky (if you know what I mean!) and so far, I've had no problems with paint coming away from the wall. Would definitely recommend!

Once the walls had two coats of paint - I was then onto wallpapering. Luckily I've wallpapered a couple of times in the past, so I have a little bit of experience in doing it. It's definitely DIYable and with a little of patience, you can 100% get a professional finish for a fraction of the price.
The first thing to do when it comes to wallpapering - is to line the walls with lining paper. This is actually something I've never done before - probably because I've just been lazy and tried to cut down on the costings. However, lining paper is super cheap (literally its about £5 a roll) the adhesive is super cheap (we're talking £3 a bag) and there are so many benefits to use it, that you really should. Not only does it prep the walls so that all those imperfections wont show, but it also helps to prevent shrinkage when the wallpaper dries - which can quite often cause that split along the seam. The wallpaper I'm using is absolutely beautiful and I certainly didn't want to take any risks by not doing a proper job, so this time around I used lining paper for sure.

Lining paper comes in different grades - from 800 (the thinnest) to 2000 (much thicker!). Generally speaking, 1400 is the middle of the road and recommended for most walls. But if you have a new plaster, you could go for a thinner and if your walls are in bad condition a thicker one would be better. The lining paper I'm using if from Screwfix which you can find here. Unlike wallpaper, lining paper is supposed to be hung vertically across the wall. However, this requires a lot more skill and despite my best efforts - I don't think it's something you can do single-handedly (Grant was at work!) especially if you're using just a ladder rather than a platform like me. Trying to hold up wallpaper, move a ladder, stop everything from creasing - lets just say it didn't work out. So after a bit of research, the internet told me vertical was OK as long as the finishing wallpaper on the top can overlap those joins. So that's what I did. 
The process of wallpapering is really quite simple - the trickiest bit is achieving a perfect join and cutting the paper to perfection. I waited a couple of days to make sure the lining was fully dry and then began to hang the wallpaper I had chosen from Little Greene, which is called 'Wrest Trail' in the colour Lead. It's absolutely beautiful and I'm sure you'll agree.

The first thing to master is how to fold the wallpaper to allow the paste to soak in. You don't want to apply too much paste, but you also don't want to apply too little. Make sure it's even with good coverage and then use concertina fold method to fold the paper to allow it to soak. I recommend this video from B&Q for a good tutorial on doing this. But here's some photos to give you an idea of the method.. 


I left the paste to soak into the wallpaper for around 5 minutes, as the instructions recommended. Each wallpaper will be different so make sure to check your own first! I then moved the wallpaper to the wall and gently lowered it into position. You want to try not to just drop the wallpaper suddenly as it could cause a tear (a helping hand is always advisable if it's your first time!). If it's the first length of wallpaper you're hanging - you'll want to draw a spirit level line onto the wall and match it to this. Otherwise, you'll want to match it up to the pattern of the wallpaper next to it.
Starting at the top, I used a wallpapering brush initially to press the wallpaper down and then a hard smoothing tool to push out any air bubbles. If the pattern isn't matching perfectly, lift the wallpaper off the back and back down into position. 


Working down the wallpaper from the top, continue this method making sure the wallpaper continues to match side by side to the one next to it. There shouldn't be any overlap and there shouldn't be any gap. Try not to overwork the wallpaper by pushing it with your hands too much as you could stretch the wallpaper. You want to just lift off the wall and back down to reposition. If you find any edges don't have enough wallpaper paste on them, lift off and apply a little more paste with a brush behind it.


It's really important to keep the front of the wallpaper adhesive free - so you'll need clean water and a sponge on hand to wipe down the edges as you go. If you don't do this, the adhesive will dry - and you'll most definitely be able to see it. I also wipe down the decorating table after each use as well.

Once the wallpaper has been smoothed out and cleaned off, you can use a roller to press down along the seam. You shouldn't be able to see the join after this - unless you have an incredibly picky eye and get up close and personal with it. But it should be almost invisible.

To cut the paper at the skirting board and ceiling, you'll need a very sharp knife and I actually recommend using a snap-off knife (like these) where you snap off the blade to reveal a fresh one every so often. We've used a metal cutting guide as a straight edge to ensure we don't go off cutting at any funny angles accidentally. Cutting wet wallpaper does take a bit of practise and I can only recommend taking your time to get it right. I actually left this bit to Grant for the most part as I knew it was something he would be better at doing. 
When it comes to the corners, I cut the wallpaper roughly to size before applying the wallpaper paste, just so I didn't have to tackle with as much paper excess putting it up onto the wall. I then pushed the wallpaper into the corners with my fingers first and then used the same tools as before to smooth it out. 


To cut long-ways, I used the same guide and method as I did with the ceiling and skirting board. The trickiest part is very top corner and bottom corner where you'll need to cut a diagonal line into the corner to be able to push the paper right into it. In my opinion, this is the hardest bit as you don't want to cut too much and you also don't want to cut too little and accidentally cause a tear. It's a bit of trial and error and will require a fair bit of patience and time to get right. 


And that's it! It took us about a half a day to do, although we certainly weren't rushing with the job. Wallpapering is very much a practise makes perfect kind of DIY, so I do recommend allowing yourself plenty of time to do it. An hour before the school run, probably isn't recommended. I still have some work to do on the chimney side of the room, hence why I haven't decorated there yet - But this side of the room is looking absolutely gorgeous! The wallpaper is truly beautiful, detailed and just stunning. It's based on original remnants discovered by English Heritage, but re-imagined, re-coloured and bought forward into the 21st century. It means the wallpaper has a slightly traditional feel with a modern kind of twist and I love that! It's the perfect for our Victorian house with its period features but at the same time, modernised. I also think it looks great with out sofa (a made.com delight) and our new vintage crate side tables, which were an eBay find of just £2.50 for each one! 


I think it also works really well next to the French Grey paint - they're along a similar kind of tone but it also allows the wallpaper to stand out against it. The wallpaper also appears to have the same kind of rich pigment as the paints - you'll notice it appears slightly different in colour with different lights, which I love. All Little Greene wallpapers are also from certified forests and for each tree used to make wallpaper, four more are planted. I had actually bought a second sofa which I hoped to feature in this post along the other wall - but to cut a long story short, it's stuck in a courier's broken down van. I know - just my kind of luck!! So whilst it's looking a little bare with furniture, it's still a massive massive (did I massive?!) transformation. It's literally added a whole punch of character into this room; something paint alone just can't do. The wallpaper catches my eye every time I walk past it - and it's beautiful detailing just pulls you in, to look at it further. It's honestly just beautiful. 


I'll be sharing more updates over the next few weeks as we build two alcove units, fix up the chimney and hopefully (finger crossed!) that second sofa arrives! But it's looking pretty darn amazing so far, right?! Let me know what you think. Do you love the wallpaper as much as me?! *The wallpaper and paint featured in this post were sent to me as part of a collaboration with The Little Green Paint Company. All words and opinions are my own. Thank you for supporting the brands who support this blog! from http://www.kezzabeth.co.uk/2018/03/living-room-makeover-with-little-greene.html 
If you've been following our Conservatory Renovation, you'll have seen this room transform from an indoor shed (not literally) to a relaxing, warmer (non-leaky!) space. I've built some DIY seating, I've painted the floor in a jazzy geometric pattern but it's still looking a little empty shall we say. I have lots of plans for this room (and never enough time) which will essentially turn it into a full indoor garden room. I'm talking plants galore, vintage garden plant pots, gardening tools and basically it will become an indoor forest of awesomeness. So when WallBoss.co.uk got in touch to ask if I wanted to review one of their wall stickers, I knew exactly the one I wanted and I needed it in this room.

Wallboss.co.uk is a website that sells a whole bunch of different wall stickers, basically for every kind of room in the house. Wall stickers are a great way to add some fun to a wall in an affordable and easy to-do way. If you can't already tell from the top photo and title of this post - the one I've gone for is a chalkboard calendar wall sticker. I thought the jazzy quirky conservatory was the perfect place to have a 'family' calendar (admittedly it's just me and Grant, but y'know!) as well as a great way to plan gardening too - which is something I want to get more into, and of course this fits right into my garden-themed room. It's a win win.
I've never used a wall sticker before so I pretty excited to see how it would work and how easy it would be to use. The sticker came rolled up in a tube and with some super simple installation instructions which seemed pretty much DIY fool-proof. 
I planned where I wanted the sticker to go using some Tesa Tape (a kind of masking tape) so I could prop it up into position and see how it would look before I went ahead and actually stuck it down. Our conservatory is still very much a working progress (the doors to the left will be replaced) so please ignore all those unfinished bits!

I then used a spirit level to make sure the calendar was straight (is there anything worse than wonky bodge job?!) and then use the same tape to put a length straight down the middle vertically, as the instructions asked.


There's 3 layers to the wall sticker - the front see-through paper, the actual sticker and the backing. I peeled back the backing along one side of the tape, cut it off using some scissors and then smoothed the sticker onto the wall using my hands. 


Yep, it's really that simple. I then went and did the same thing to the other half of the sticker, finishing off with using a flat edge (a bit of card will do) to make sure it was all pressed down properly to the wall with no bubbles.


And the final step? Just remove the front sheet of paper slowly and carefully. 

And literally, that's it. It probably took me less than five minutes to do and required no prep work and virtually no tools. Well I did say it was DIY fool proof, didn't I?! The only bit you have to be careful of - is removing the front paper slowly, otherwise you can lift off the sticker. However I will say, it seems the sticker can be removed without removing the paint - which is something I was slightly worried about if I were to ever change my mind on it. But nope - it doesn't appear to ruin the actual wall beneath.

You can use either real chalk or chalkboard pens on the sticker - which I really like, cause I'm not a huge fan of actual chalky chalk. Kinda gets everywhere and leaves you with feeling like you need to wash your hands after every use. Chalk pens are so much easier to clean off too and of course, I like the fact you can buy endless colours as well. I use Chalkola pens on mine and can definitely recommend them. 

I think the sticker it fab - the only thing to bare in mind is that you do need to commit to it and its location once it's stuck down. There's quite a few different 'parts' to this particular wall sticker that would be make it pretty difficult to relocate later. However, I personally wont want to be doing that and I'm really pleased with it in here. Just something worth thinking about before you go sticking it anywhere.


So here's a quick little before and after of this spot in the conservatory. You can see how it's totally changed an empty wall into something fun, useable and practical too. It looks modern and I think, fits really well. I think it'd also be great for an office or even a kids room to get them involved with planning things to do too.
 
This particular wall sticker currently retails at £29.99 which you can find here. But Wallboss.co.uk have a whole range of different wall stickers - from birds and trees for nurseries to Banksy graffiti style ones to worded slogans and even custom design ones. There's basically something for every room, so if you're interested in a fuss-free way to add some character (or practicality!) to a wall, then do go check them out! Have you used wall stickers before? What did you think to them?
*I received the wall sticker in this post to feature in a review. Thank you for supporting the brands who support this blog!
from http://www.kezzabeth.co.uk/2018/03/a-chalkboard-calendar-wall-sticker.html 
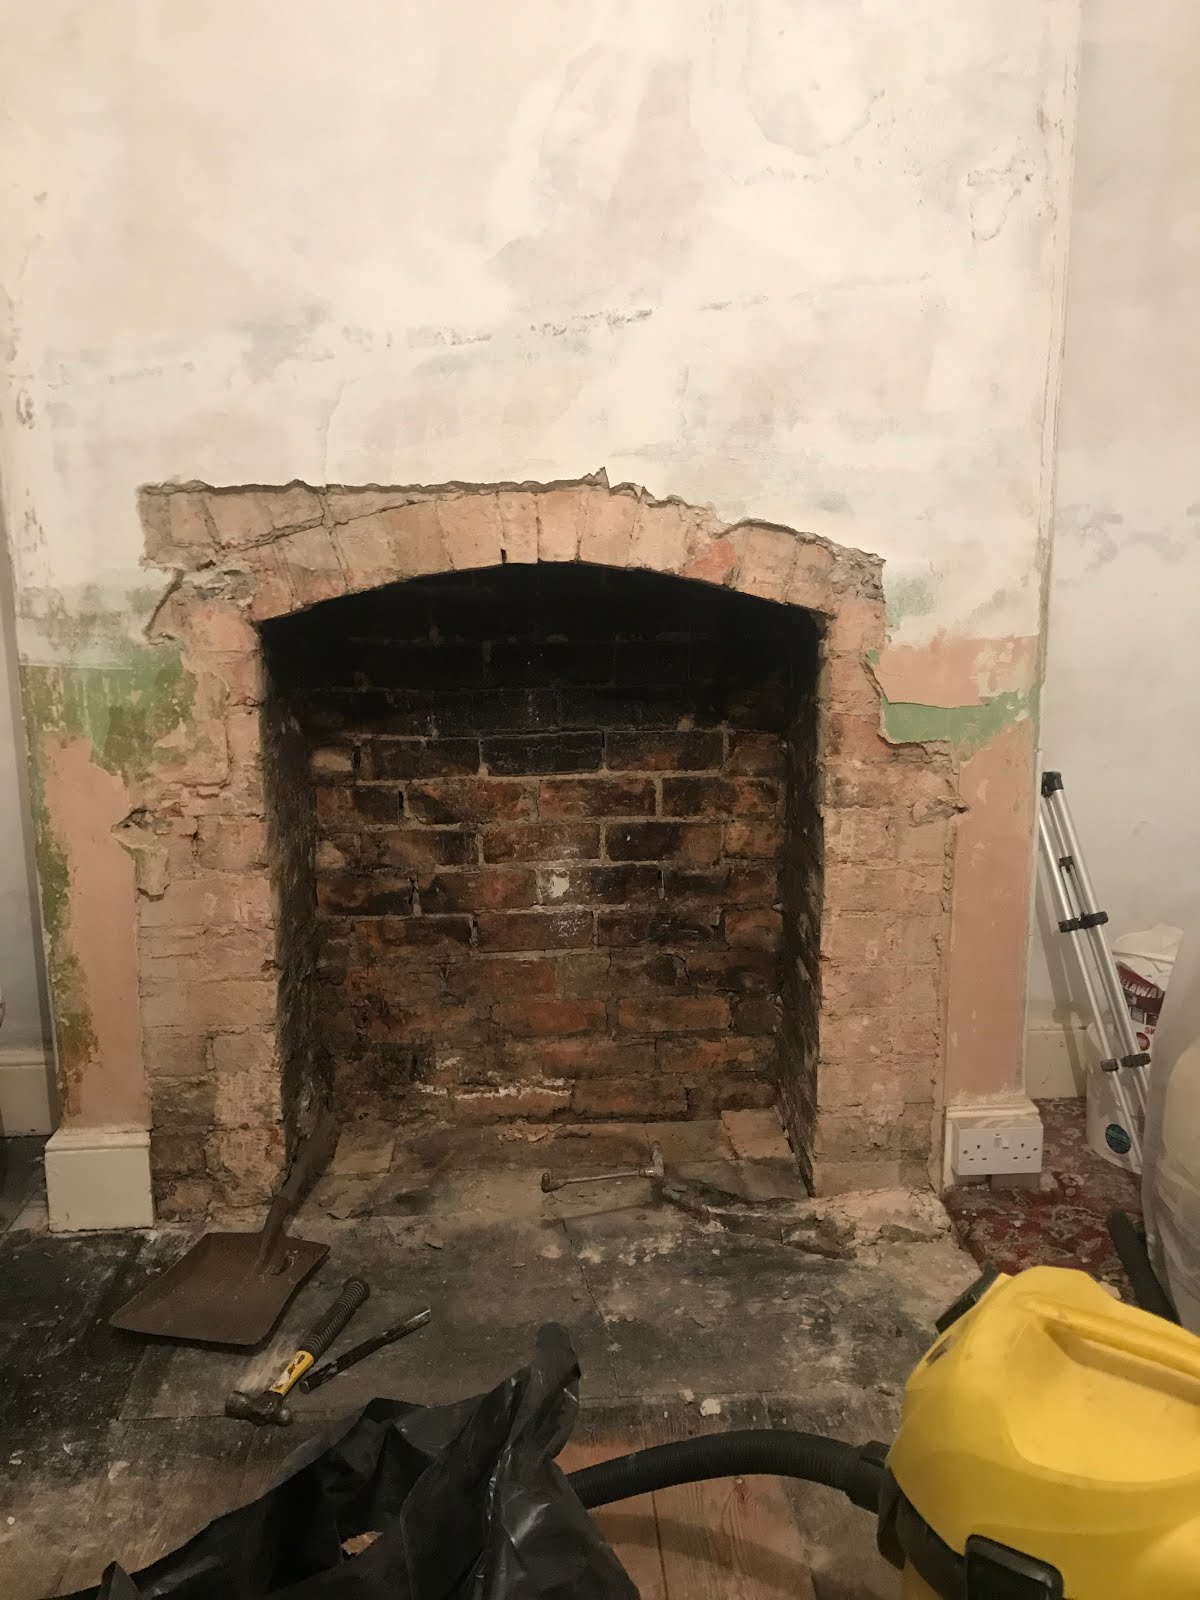
One of the most hideous features of our living (aside from that floral carpet!) was the 70s style gas fireplace. It just kills the period features in the room. The cornicing, the panelling around the window; all those gorgeous original features, dominated by one giant ugly fireplace. Luckily, we had the gas to it disconnected back when we did some work in the kitchen a couple of years back (always thinking ahead!) and so now we're renovating the living room, it was finally time for this old thing to get gone. Finally! Thank the lord! 

You'll remember we removed a similar old back boiler fireplace from the dining room a couple of years back, so we now have some experience when it comes to removing these things. By experience what I really mean is, forceful man power. Turns out these things aren't often held in by much and it took a mere 30 seconds to literally wrench the whole thing off the wall. Probably the quickest transformation you ever did see! It was there and then, it was gone.


(Word of caution when you open up old fireplaces - always be aware of the possibility of finding any asbestos board or insulation that could be hidden behind old fireplaces. I've written a whole post about asbestos, which you can read right here. But when it comes to uncovering anything pre 90s it's something you should always be aware of potentially coming across.)
Looking better already I'd say! But of course, we weren't stopping there. We planned on opening up the whole thing in the hope of *one day* (I'm talking years away here!) having a log burner in there. When it comes to opening up an old chimney - you never really know what to expect. There should be a supporting arch to hold the brickwork up above (fingers crossed!), but more often than not, these have usually been removed and replaced for concrete lintels. You may even find neither an arch or a lintel, which is also quite common (this is what we had in the dining room!) due to more lax building regulations in the past. You may find the chimney has been completely blocked off, or you may even find original features in there - like parts of an old fireplace. Basically - it's super exciting because you never know what you might find. The thing I was hoping for the most - was an arch.

A week or so later, we started chopping off the plaster to inspect the brickwork beneath and start opening it all back up. I say *we*, but actually Grant did all the work whilst I took a rest for the day and basically took all the photos ;) He used our trusty SDS drill with a chisel attachment which makes the job a thousand times quicker and easier.. 
We wanted to preserve as much of the original plaster as possible, so we only planned to go as high as we needed to - which would be as high as we could see either an arch, or a lintel. If you have an arch (in good condition) you don't need a lintel. If there's no arch, you'll need a lintel, even if there's one missing! You can check out our chimney opening in the dining room to see how we DIY fitted a concrete lintel there.
Grant chopped off the plaster fairly high and there was no arch or lintel in sight, so I convinced him to climb into the opening to have a look from the inside (after all, we didn't want to chop off all the plaster unnecessarily if there wasn't one). Thankfully, a couple of rows of bricks higher and there was one!


It was everything I had hope to find in the dining room a few years back, that had been destroyed. It was high and beautifully formed, in good condition and I was hella excited about it!
We then had to go about removing the bricks beneath the arch - which needs to be done really really carefully to ensure you don't go destroying the arch. We recommend doing it by hand rather than power tools and just take care to carefully chisel out the mortar, rather than go bashing your way in. The arch after all, is supporting all the bricks above so it needs to be solid and free from movement. So you don't want to be causing any movement with lots of heavy bashing. Take your time and just go about it with some care.


Slowly but surely, starting right underneath the arch we could see it all open up. And it is beaaaautiful!


When Grant got to the 'mini opening' (the bit that had the metal sheet over it) we discovered a rather unusual lintel.... A metal pipe. Yep, a pipe to support those bricks above it. Well I did tell you builders were more lax back in the day didn't I?!


And just like that, we now have one giant arched chimney opening in our living room. Isn't it glorious?! It's made the room feel so much bigger now there isn't a giant gas fireplace sticking out from it. It adds depth to the room, has given the chimney breast a focal point rather than just being a giant box in the room and the sooted up bricks show off the age and character of this building. Needless to say, I love it! 

The plan is to keep the brickwork inside the chimney exposed although it will need to be cleaned up a little so the soot isn't constantly staining everything or falling off. But generally speaking, I like it rustic just as it is, imperfect mortar and all. We'll patch-plaster around the opening where we've chopped off too much plaster and we'll also fit a new hearth (plans for that will be revealed soon!) so that it will be log-burner ready for the much distant future. 
So, from 1970s fireplace back to Victorian style in all in a matter of hours. I know which one I prefer! How about you?
from http://www.kezzabeth.co.uk/2018/03/uncovering-victorian-chimney-arch.html 
I wrote a post a while back about how to make your home smarter which included all the stuff we have within our home, as well as some stuff we don't have. Smart lighting was on there, something we didn't have and something I've never been *too* sure about. As much as I love the idea of it; it's pretty expensive to buy and is it really worth the money or is it just *another* gimmick? Well having now finally tried it out, I'm sharing my thoughts...
What Is Smart Lighting?
I'm fairly sure everyone knows what Smart Lighting is by now - but in case you don't (where have you been?!) - it's basically a special kind of light bulb that not only allows you to control it remotely but it also gives you more control over the type of light it emits. So there's no need for dimming switches or deciding between "cool" or "warm" light bulbs - you can have both and oh so much more, and you can also get bulbs that emit colours too. And of course if you have one of these fancy Home Hubs (Alexa or Google Home etc) you can usually control them through voice commend too.
Every Smart Light Bulb on the market is a little bit different - but the one I've been sent to review for the blog is a pair of bulbs from Wiz.World (you can find them on Amazon here) which I've been trying out over the last month. The thing that makes THESE bulbs unique is that you don't need an additional hub in order to connect them to your wireless network. It's all done in the light bulb itself.

I have to say these are THE most luxurious packaged lightbulbs I have ever seen. It felt like I was opening up a new iPad or something; it felt like a cool technological gadget. The kind of thing you put on a Christmas wish list (speaking of which - I reckon with a box like that, they'd be pretty gift-able too?!). 

So the bulbs I'm trying out are B22 bulbs (the kind for bayonet fittings) but they do also sell screw-fitting bulbs and even spotlight bulbs as well amongst a few others. These are also the coloured versions of the bulbs and I have the two-pack set which very handily also comes with a little remote. This set retail for £69.95 at the time of writing this blog post.


You can see how they visibly look different to standard bulbs. They're a little chunkier and of course they have no filament, being LEDs.
How Do They Work?
Simple really; they just connect to your wireless network. So as long as you have a router or the like (doesn't everyone?!), you can have these smart light bulbs. Unlike other brands, you don't need an additional 'hub' in order for the lights to work which makes these a whole lot simpler to set up; it's all built-in right inside the bulbs. Genius! In fact, it even claims to have a 30-second installation set-up, which to be honest, I thought was going to be a tad exaggerated - but actually other than taking 15 seconds to type the Wi-Fi password into the app, there was literally nothing else to do other than turn the lights on and off five times. It's technophobe-fool-proof. Literally.


I've been trialling these lights in both the dining room and the home office, because I wanted to get an idea of how they're meant to be used around different rooms in the house. When you download the app, you can add each light bulb to its own room and you can also identify each bulb within the room with a different icon that correlates to that light fitting. From hanging bulbs to pendants to table lamps, there's enough icons to clearly identify each light fitting. You can even identify one table lamp for another. For the sake of this blog post, I'm photographing the office light fitting only - purely because it's much prettier and shows off the effect of the bulb much better. And I'm sure you'll agree!

Yep it's a giant ball of fluff on my ceiling and I love it. For anyone interested, it's a Amazon bargain find of just £33 which you can find right here. Being white, it also means it's the perfect shade for showing off the light bulbs infinite range of colours. And speaking of which - there's 16 million of them to choose from! Maybe you want a light pink hue to fill the room..

Or even a darker hot pink..

OR a cool blue..

Or even a green? 
OK, I'm sure you get the gist by now. Literally, I kid you not when I say the options are endless though. With 16 million colours available, it's doubtful you'll ever use them all. But, you could, in theory. Coloured lights may not necessarily be for everyone - but if you have young kids, it's a great way to add a bit of sensory stimulation to their rooms. And it's also a fun way for older kids to change the entire feel of their room at the drop of a hat. They can hit up FLAME RED as they pretend to be Fireman Sam (Or is he so 90s now?) or even COOL BLUE as they pretend to be at swimming in an ocean. You get my drift. I think it'd also be wicked for parties, adult ones as well as kid ones. Or it'd even be fab in a cool man-cave or cinema room. I also know lots of people who love the odd spot of colourful LED strip lighting throughout the home too - so I'm certain they'd love this in a table lamp!

Aside from having a bit of fun with the colours, it's also said that the colour of light can affect our moods. If you're feeling anxious, a calming mint green light is meant to be best. If you need cheering up, for yellow. For each colour you pick, you can also alter how dim/bright you want it to be too. It can be as gentle or as vibrant as you want.
But if colour isn't your thing, then perhaps 64,000 shades of white will make up for it instead? I know what you're thinking "HOW?!" I thought that too. Turns out there's orange white, yellow white, blue light, bright white, dim white, barely there white, bright as the freaking sun white. More whites than I ever deemed possible!


As much as I love the coloured aspect of the bulbs, I think the different white lights excite me even more. You can even simulate 'daylight'; which, being a blogger and needing to take a lot of photographs - is blooming' amazing! No need to plan my photos around daylight hours, I can now get a good shot whatever the weather. I also work night-shifts as my *day job* so it's also a great way to simulate daylight hours during the nighttime, so not to mess with your internal body clock so to speak.
Even for normal day-workers and non-bloggers it's fab though. A brighter light in the morning gives you punch of waking up you need, a more relaxed calmer light in the evening is perfect to chill out under before bed. You can select the perfect working light for cooking in the kitchen, or the perfect 'calming' light for doing a spot of yoga. In a nutshell, you can literally always create the *perfect* lighting for a room depending on how you're using it that day. I think it'd be awesome for mood lighting during a dinner party! 
Features Within The App
Along with the bulbs and remote, there's also a free downloadable app which has a few additional features which I thought was also worth a mention too.
Fade In, Fade Out - Need I say more? Love it!
Wake-Up/Bedtime Lights - This one is actually amazing! You can set the lights to slowly come on/off within a 30 minute period, depending on whether you're dozing off to sleep or waking up. It in effect, acts like a Lumie Bodyclock (or similar) without the extra cost. I love it!
Schedule Your Lights - Doesn't need me to say much more, does it? Perfect for holidays or arriving home in the dark and having to stumble your way across a shite-tip of a hall to find the light switch (if you follow me on Instagram, you'll know what I mean!).
Plant Growth - Once I saw this setting, I was pretty sure I'd seen it all. Yep there's a light to help your plants grow! It's insane. And it's brilliant. And perhaps I should have bought this much earlier and I could have saved a few plants!
Night Light - This one is basically like those plug-in night lights you can buy. It has a very gentle glow that means you don't have to stumble across a dark room to find the toilet, or subject your eyes to a hard blinding wake up call by turning the lights on. We've used this feature every single night in the dining room. So handy!
Themes - There's a whole range of different pre-set 'themes' depending on how/when you're using your lights. From the perfect light to watch TV with, to a 'Party' theme, a 'Romance' theme and even seasonal themes.
Adding 'Moments' - If you want to save a certain light setting and remember it as a particular event (say Valentines Day Meal) can save that 'moment' with a photo and re-create that exact light at a later date at the touch of a button. I think that's a really thoughtful addition which is great for special occasions. Everything in the app is really easy to use and it's really well organised. I didn't have any problems with connectivity or any problems in general. It's simple and it works. 

With the two-bulb set, you get the handy remote too, which allows you to pre-set your four favourite themes, instantly turn the bulb into a night light, as well as alter the brightness at the touch of a button. One remote can control every bulb separately - you just need to point it at the right one. Brilliant!

How Long Do They Last?
That depends on how often you use them. But these bulbs claim to have a lifespan of 25,000 hours which is equivalent to around 10 years if the bulbs are used for 6 hours every day. Which is better than any energy-saving light bulb I've ever used! And at £69.95 for the pair, I think that makes these a pretty decent investment! So I think I've covered the main features and the only thing I haven't tried out myself is connecting it to a home hub, as we haven't got one of those. In the last month of testing these bulbs out, I haven't honestly used the colours that much. I think they're fab and whilst I'm quite partial to the hot-pink look in the office; most of the time we've used the bulbs in different white settings. I can totally imagine myself using colours for a party or special event, but for day-to-day use the colours aren't seeing much action from us. That being said, we did have a disco theme going whilst drinking prosecco a few weeks back. It's something that's nice to have from time to time, but not necessarily for everyday use. Unless you're totally into that! 
For us, it's all about the white settings. Going from daylight to a working light to a dim evening light has really been amazing. I've found it easier to get to sleep after being underneath a dimmer relaxing light in the evening and I've also felt so much more awake in the mornings after using the daylight settings. I wish I had used this during the winter months as getting out of my bed in dark hours is something I quite often struggle with! We're currently renovating the lounge at the moment and planning our lighting for the room - and I will be definitely be purchasing a couple more white ones for table lamps in here.
So, would I recommend? Absolutely, yes! As long as having changeable lights is something you would use, then I think it's a serious worthwhile investment. It's certainly not necessarily for every single light fitting (I'm certain still a huge fan of the Edison bulbs!) but where it's useful - it's absolute brill. It's a bit of fun and at the same time, it's surprisingly useful in ways which you wouldn't expect, until you use one.
Do you have smart light bulbs? What do you think to them?
Products Featured:
*The Smart Lighting featured in this blog was sent to me to review. Thank you for supporting the brands who support this blog! :) 
from http://www.kezzabeth.co.uk/2018/02/smart-lighting-wiz-light-bulb-review.html 
If you didn't catch my last blog post - then the breaking news of the blog the week, is that we've finally started our living room renovation. Yep, almost four years in - and it's begun. Luckily this room is in fairly good shape so doesn't require too much work - it's just quite dated; as in, it hasn't been revamped since the 60s. Eurgh!
I've spent the last couple of weeks stripping wallpaper, repairing the old ceiling and patching up the wonky and damaged walls. We're already beginning to see a fair bit of progress in this room and if you're following me on Instagram, you'll have seen all of this already. I was asked a fair few questions about how I remove wallpaper and how I'd be repairing the old walls. I'll be explaining the later soon, but I thought I would write a post specifically about removing wallpaper first.
Removing wallpaper is such a simple straightforward process that I didn't really think it was something worth writing about. But that being said, if you've never done it before - then it's something you may not know much about. After all, everyone has to start somewhere. So I thought why the hell not write about it! I've removed wallpaper from around 10 different rooms throughout two houses and my techniques are ever-evolving to perfect the quickest and best way to remove wallpaper. If my knowledge can help anyone out there, then why not! So, these are just my personal tips for removing wallpaper the easiest way I know how. If you'd like to add any further advice you have to share, then please do leave them in the comments below! 
Removing the Top Layer There are so many different types of wallpaper out there - from textured ones to more vinyl-feeling ones and even the dreaded wood chip ones (I've never removed this though - so I have no tips on that front, sorry!) and all wallpapers are different in how they come off the wall. Some come off so easily, you can just pull them straight off, others take a bit more work. The type of wall or plaster they're attached to also makes a big difference and the more wallpaper you remove, the more you'll notice this. Usually wallpaper has two layers to it - the top layer and an underneath layer (you may even find multiple layers different types of wallpaper - in which case, unlucky you!!). The top layer is usually much easier to remove and once you've got a corner unlifted, you can usually pull this off in large sizeable chunks with your fingers. The underneath layer is the bit that's glued onto the wall - the harder one to remove. 
Using a Wallpaper Steamer I didn't invest in a wallpaper steamer until about two years ago when I stripped the dining room and kitchen. Until then, I had used either a combination of hot water and a sponge, or a steam mop (yes really!). Both of which did work and you can most definitely remove wallpaper without the aid of a steamer; but a wallpaper steamer is THE quickest and easiest way to remove wallpaper. Our steamer cost just £25 from Screwfix (here) and I definitely wish I had purchased one sooner. The way a wallpaper steamer works is to heat the glue behind the wallpaper enough so that it softens and can literally be wiped off the wall. The downside to steaming, is that it does cost a fair bit to run (think kettle constantly on the boil!!) and it can leave the room quite wet and with a lot of condensation. Having a window open is definitely recommended and taking a fair few breaks to let the steam disperse helps quite a lot as well. As I said, you can soak the wall with hot water instead, but I definitely find using a steamer much easier and much quicker - and it's definitely my personal recommendation for wallpaper removal. I generally hold the steamer to the wall for around 15-20 seconds before stripping the wallpaper off. If the paper looks wet, then you know it's ready to go. It's important not to hold the steamer onto the wall for too long as it could cause damage to the plaster beneath. It's a bit of trial and error thing to know exactly how long to leave the steamer up for - as I say, all wallpapers are different - but once you get going, you'll know. 
Buy A Quality Stripping Knife Having a decent stripping knife will make your life SO much easier. Imagine trying to strip wallpaper with a spoon - you'd be there all day flaking off bit by bit. Having the right tool for the job, really does go a long way. The first thing to look for in a wallpaper stripping knife, is that it's nice and wide. This will cover more area at once and cut your time in half! The second thing you want to look for, is one with replacement blades so that you can ensure your stripping knife can always stay sharp. A blunt knife will miss bits of wallpaper and take much more effort in pressing it to the wall to get underneath the paper. This is the one I have, and I definitely recommend it, although it's best when it's blunted just a little (otherwise you have to be careful not to scrape up the wall!). It has a long handle for harder to reach areas and it's also soft to grip, which stops you getting hand blisters. You'll know what I mean if you've spent days on end painting with a roller!! Ouch. 
Master the Art of Using Two Hands If you're on a mission to strip wallpaper in a speedy time - then you'll need to master the art of using both hands. I use my left hand to hold up the steamer until the wallpaper is wet enough to remove and then relocate the steamer to another position whilst removing that wallpaper with the stripper in my right hand. It keeps the process constantly going and your left hand will always be one step ahead ready for your right hand. Does that make any sense? It means you never have to put your tools down and once you've got a good system going - you can just keep going until you need to re-fill the water tank of the steamer. It's the most efficient way to work as quickly as possible when it comes to stripping wallpaper. Or at least, it is in my opinion. ;) 

Removing Residue Once you've gone over the walls once and removed all the wallpaper, you'll inevitably find the wall will have a sticky feel to it (if it's still wet!) or it may otherwise have solid chunks dried to the wall. This is because in the steps above, we've been removing the wallpaper and not specifically the residue, which a lot of always ends up getting left behind. I've tried a few different techniques to remove the residue, but the quickest and best in my opinion is to use the steamer again. I go back over the walls with the steamer, holding it this time against the bare plaster and then I use the stripping knife to scrape away that residue. You'll see it gather up in a really sloppy gooey slimy chunk (nice!) and you can lift it straight off the wall and wipe it onto a towel (or floor if you're lazy like me!). I do this over the whole wall and it removes the gunk in no time at all. I have also tried scrubbing hot water and fairy liquid onto the wall, which also works but takes much longer. But if you don't have a steamer, this is definitely another option though! 
Sanding the Walls Smooth The very last thing I do is to quickly run some sandpaper over the whole wall. There's a good chance you may have missed the odd bit and there's still a slightly rough texture to the wall in areas. Having a smooth wall is especially important if you're plastering back over the wall and the last thing you want is anything being dragged through fresh plaster - your plasterer WILL NOT thank you for that. Likewise, you don't really want to be painting over chunks and having to scrape them off later either. A quick sand and feeling the walls with your hands will identify any bits that aren't perfectly smooth. It shouldn't take too long as you'll find it's really just the odd bit that needs attention. 
And that's it! I hope that helps anyone who's new to wallpaper stripping, or if you're just looking for some new/different techniques to try. As always - I'm no professional, this is just the best way I've personally found to strip wallpaper. If you have any advice to share or alternative ideas, then please do! I'm always open to new techniques :) Here's a few shots of the living room under work and how it's looking now it's fully stripped of wallpaper. 


Pretty right? I'll be sharing how we're patching the walls (and ceiling) in my next blog post, so stay tuned for that ;) Until then, happy wallpaper removing!
from http://www.kezzabeth.co.uk/2018/02/tips-for-easy-wallpaper-removal.html 
New year, new room! Well, sorta. I mean technically speaking, we're already a month into 2018 so I'm not tooooo sure we can still this part of the "new year" timings... BUT, we are now finally starting a new room renovation for 2018! And at long last, it's the living room that we're tackling next.
Our living room has been an absolute mess since.. well, since we moved in. It started as a place to store all our moving boxes whilst we moved in, then somewhere to store DIY tools as we renovated the kitchen, then it became a dumping ground for all the stuff we needed to take to the skip and now finally, almost four years later - it's empty and ready to renovate!
The photo above is how the room looked the day we moved in (before we moved in, I should say!), so it's not really a true representation of how it's looked as we've used this space. And truth be told, we haven't really used this space. The gas fire proved to be handy during our first year in the house as it was the only source of heating, but since that first winter we've barely used this room and very rarely spent time here. What the room has actually looked like...

You see what I mean? Not exactly a practical room for chilling out in, is it? This room is also massively chilly thanks to its ill-fitted windows so even at its emptiest, it's just not somewhere anyone wants to be and generally speaking, I'd rather chill out in bed than in here.
BUT after a good old clear out earlier in January, we finally have a room that's empty - and all that hate for the room is soon about to change. So I wanted to share some 'before' shots of the room before we get started on the demolition work and also explain some of our plans for this room. So without further intro, here's what the room looks like pre-renovations...


As you can hopefully see - it's quite a large room. Or at least, large by my books. But the room has no substance; not much furniture, no life, no soul. It does however have quite a bit of character - from the panels around the window to the cornicing at the ceiling and these are the things I absolutely LOVE about this room and can't wait to celebrate in here. And then of course it also has a rather dated fireplace and half the floor is still covered in hideously red floral carpet (under the sofa!), which I can't wait to destroy. We have lots planned and work has actually already begun.
The Plan!
Light and Bright
We're keeping this room as light and as bright as possible. I can't stay away from grey, but I want plenty of lightness to this room. A light grey, white woodwork and pops of colour. Nothing dark (we have enough of that in the kitchen and dining room!) and as much as I love dark spaces - I want this room to feel as though it's filled with light and punches of colour.
Alcove Cupboards
One of the main things I want to do in this room, is to build alcove cabinets either side of the chimney breast. I love how sophisticated and 'formal' these make a room feel and they're a great way to make alcove space more usable too. It'll also double-up as a way to hide the electric fuse box and provide us with somewhere subtle to hide the TV and all those hideous on-show cables. We also plan on using it to store plenty of books and I'd also like to incorporate another (smaller!) log stack within this too. Basically - this is going to be the feature of the room!
Exposed Floorboards
You guys know how much I love the period features of this house and floorboards are included in that. So we'll be stripping them back and putting them back on show. It's a much cheaper option of flooring than carpet and probably much more practical with two dogs as well. We've restored the floorboards in every room we've tackled so far, so why should this one be any different?
Window Shutters
I can't begin to count how many rooms I've said we'd be *eventually* buying window shutters for - and we still haven't. Let's face it - they're a bloody expensive investment! I would LOVE to have some shutters in this room, but if budgets don't allow (they definitely wont allow!) then I'm thinking of DIYing some full panel block-out shutters in here instead. Admittedly it wont quite be the same, but I'm determined to have something similar on the cheap.
Open Fireplace
We'll be opening the chimney breast back up so we can make use of the space in order to make some heat for this room! Initially we thought about adding a period fireplace to use an open fire with, but I'm now collaborating with a company to add something a bit different to this room. It's not a fireplace and it's not a log burner - but it does make heat. All will be revealed soon!
Colourful Sofas
So we already have one sofa - a dark grey number we bought from Made.com when we first moved in, but this room is huge and we absolutely need another sofa in here. I quite like the idea of non-matching sofas so I'm after a secondhand colourful sofa instead. Something pink or purple-y ideally and similar in design to the Orson sofa. I'd also love a cushioned footstool to use as a coffee table, but I think that one might be a DIY - we'll see!
Wallpaper
I haven't used ANY wallpaper in this house yet, so I'm thinking of incorporating a 'feature wall' opposite the alcove cabinets in here. I want to do something a bit different and something stand-out that doesn't involve using dark colours - and I think wallpaper might be the next go-to option. It'll be light in colour and fit in the 'light and bright' theme, but just provide a bit of extra interest to the room.
And that's about it! I'm keeping the room pretty classic and traditional with a sophisticated feel. If you want to see some of the inspiration behind my plans, then feel free to check out my boards on Pinterest. Here's a little sneak peak of one of them!
So there's not toooo much heavy renovation work required in here, although we do need to fix up the walls, fix up the ceiling, relocate electrics and chase wires into the wall. But there's nothing drastically structural that needs work (or at least nothing we've discovered yet!) so we're hoping this will be a fairly easy six-week renovation and will hopefully be nice and smoooooth. Famous last works eh? Anyway - watch this space! ...Literally.

from http://www.kezzabeth.co.uk/2018/02/living-room-renovations-begin.html 
Way back when I started planning the conservatory I decided we needed another pallet seating area in our life. Yep, you may remember the one I built in the garden way back in 2015 (jeez has it really been that long?!) well this time I'm building something a bit different, but at the same time, very similar (makes sense right?!) and this time, it's going in the conservatory.
Having learnt from my experience the first time around, I knew exactly what I wanted to do different and how I could improve on my initial design. This time around I wanted to make use of the space underneath the seating - that is to say, I wanted to include some storage space. And I also decided I wanted to tone down the full rustic look too. Instead of just using pallet wood and nothing else - this time, I wanted to use some panelling as well. This way it would be less rustic and a bit more refined and bespoke looking.
So if you're interested in making your own - than stick with me, because I'm going to do a full tutorial to show you just how easy this is going to be.
Things You Will Need:
Tools Required:
Step 1 - Remove Slats from Pallets
In order to make the wood you have go further, you'll want to remove almost all the top slats of the pallet. Depending on how your pallet is built, you will probably find the two end ones (and maybe the middle one) are integral to the structure of the pallet and these can't easily be removed. The others however will pop right off. You can do this with a crow bar but if you're struggling I highly recommend getting yourself a lifting bar. It's basically a giant crowbar but it enables you to have a much greater leverage and it pops the slats right off without any of the hassle. Removing all these slats is also vital if you want your bench to include some storage space as well. We removed all the slats, apart from the two end ones.


Step 2 - Position Pallets And Screw Together
Now we're getting to the fun bit! So you want to position your pallets as you intend the seating to be. Once this is all built it's going to be pretty heavy, so it's easiest to build it in position rather than trying to move it at a later date. The idea is that it's going to appear as a "built in" piece of furniture anyway - so you really do need to think about its positioning before you begin because it may not even fit elsewhere later on. The layout I'm going for is an L-shape, however you can of course just have it as a single straight length of pallets instead, if you want. If you're going for built-in storage too, you need to leave a small gap between the back of the pallets and the wall. This is so that the lid wont hit the wall and prevent it from being fully opened. My gap is around 2cm. You may also find some pallets are a little lower in height than others - you can use a plastic or wooden wedge to prop up any pallets if needs be. 

You may also want to chop some pallets in half to get the exact size you want. We actually have a vent between that needs to be kept clear (for the log burner) so I've cut a pallet in half to ensure it's not blocking it. 
Once the pallets are all in position, you then want to take the time to ensure they're all flush with one another at the front and the side. Pallets are never perfectly matching to one another in how they're built, but generally speaking they're usually close enough. A giant spirit level or straight piece of wood helps well in achieving this. It's a little fiddly, but a super important step because this will affect how you attach the panelling later. 
You may find that not all the wood matches up against one another perfectly and as I said, this is perfectly normal when it comes to pallets - they're not made exact. You can see below in this image the top slats on the pallet all line up and match well, but the bottom slats don't. That's totally OK. As long as none are sticking further out and at least half are flush and in line then you're winning. 
After everything has been perfectly positioned, you can then screw the pallets together. To do this, you want to screw through the bottom slat of one pallet, into the top slat of the pallet into beneath it. You'll need to make sure you use screws that are long enough to go through the top wood and into the second, and you want to do this across every slat possible. In my case, that's 3 slats on each pallet. This is going to pinch the pallets together, essentially so they're all connected and become one giant stack of pallets. 


Hopefully you're still with me and I'm still making sense. The next step is then to connect each stack of pallets to one another, side by side. In order to do this, you'll need some very large screws to go between the larger chocks of wood from one pallet to another. These bits. 
I've had to go through the sides of these at an angle because my screws weren't quite long enough (major rookie error and I couldn't get out to buy more!) but ideally you'd just want to go in straight from the side. If you do have to go in at an angle, you can drill out a bit of a hole to get the screw in deeper, as I've done here. 
Now you can see there's a gap between these chocks of wood (which yes, isn't ideal!) but even with the gap, it's most definitely enough to hold the pallets firmly together. If you can though, I would cut some pieces of wood to size to fit into the gap. This will just ensure the screws are pulling the blocks together nice and tight, which obviously isn't happening with a gap. I however didn't have enough wood for that and decided that since there was virtually no movement anyway, to just roll with it. You can also add some cable ties around these if you want to ensure it's even more extra secure, which I also did instead.

Step 3 - Attach Top Trim
Now that the bench is all built and connected together, you can begin to make it look pretty. So as I said before, I'm using panelling to make it look a little more refined and it's also really cheap too. But to make it look even more professional, I'm also adding both a top and bottom trim to just "finish it off" so to speak. As a quick guide, this is basically the look I'm going for.. 
The top trim is just using a very thin piece of timber, which is around the same thickness as the panelling (mine is slightly thicker - but that's OK). I've used a mitre saw to cut it to size, making sure to give the corners a 45degree angle for a more professional finish.

I've then used some loose head nails to nail it into place, lining it up to match in height to the top of the slats (the seating bit).


Step 4 - Attach Panelling
The next job is to attach the panelling. The one I'm using is this one from B&Q which is just £3.15 a pack (seriously, bargain!!) and they're tongue and groove made, so each one slots into the next one which makes it so easy to fit. I've cut the panelling to size using a mitre saw (always!) and since the panelling I've bought is 89cm in length, I've managed to get two bits from each plank. I absolutely love this stuff and we've also used it in our bathroom too. So cheap, so good! 
It's important that the first bit of panelling you affix is spirit level straight (both horizontally and vertically), otherwise you'll end up going off at an angle and have a huge gap between it and the top trim. Once the first piece is perfect though, you can't really go wrong with the rest as long as you make sure the panelling is properly pushed together each time. I've used panel pins to affix the panelling and these are just nailed into the wood on the side of the pallets, which you'll remember we aligned to be flush at the beginning.

Starting to see how it'll look? My top tip for using super small panel pins is to hold them between your fingers like the photo beneath, rather than pinching them. It helps massively when nailing them into position! I've used four pins per each slat of panelling, which seemed to be enough.

When it comes to the corner bits, I personally leave these till last. You can measure up the cut you need and I've used a jigsaw to cut these to size. It doesn't matter if the cut isn't perfect because we're going to use some corner beading over it anyway. This is the last step, but you'll see what I mean in a bit!


Step 5 - Add Skirting and Corner Beads
Once the panelling is nailed into position you can then add some skirting. I've gone for a very basic 'D-finish' skirting (because from the side it looks like a 'D'), which is quite short in height, so it doesn't swamp the panelling. Again I've used a mitre saw to cut to size and affixed with yet more nails into the larger chocks of wood on the bottom pallet. Can you see how easy this DIY is?!


After the skirting is done, you can then add the corner beads, which will butt up onto the top of the skirting and beneath the top trip. These will hide any imperfect corner cuts and they'll just make the inner and outer corners look a bit more 'finished' and sleek. Since these are quite thin, I didn't want to chance nails splitting the wood, so I've simply glued them into place instead. 

Step 6 - Recess all Nails If you haven't already, you'll want to go back over each nail and recess them into the wood. This will enable the nails to be hidden so that you can fill over it before painting and they'll become completely invisible. To do this, you'll need a nail punch set. Simply line it up over the nail and hammer into it, until the nail is completely sunken into the wood. It's kinda therapeutic, I think! 
Step 7 - Caulk & Fill
So you might find you have some little gaps here and there - which is no problem at all. Since we're painting this (or at least, I am!) you can just caulk any gaps up, because once it's painted you'll literally never know. 
You'll also want to put some filler over all the nails (yep, there's going to be a lot of them!) and once it's dry, sand it back.


Step 8 - Paint!
Onto the good stuff - painting! I know some people hate painting, but personally it's my favourite bit. I'm using Valspar's wood paint in an eggshell finish, colour-matched to 'Downpipe'. I haven't bothered priming and I'm not even sure you even need to with this paint. I have however given it a quick sand between coats and with this Valspar paint, I only needed two coats to get a full coverage finish. I think the dark grey it looks awesome against the pink wall (also Valspar, read about that here) and it's made the seating look all the more quality-finished and expensive looking. 


Step 9 - Make Hinged Lids
You might have noticed we haven't got any actual seats yet - well this is the very last major bit of DIY and we're almost done, I promise! If you removed all those slats at the beginning, now is when they'll be put back to use. If you're not having storage, you can simply put the slats into position and nail them on the top. But, if you're going for storage like us, then instead of nailing them on, we'll be attaching them together so that they're all connected together to open as one. To do this, you'll want to cut a piece of timber to size that will cover all the required slats and then screw it into the slats. Kinda hard to explain, but like so... 


I then used a combination of a belt sander and a hand sander (actually a multi-tool with sanding attachment!) to sand back all the slats so they looked a little less rustic. I do quite like a little bit of a rough rustic look though, so I haven't over-sanded mine.


I then used flush hinges to attach the lid to the seat. This was pretty difficult to do alone, considering you need about four hands to hold the lid into place whilst screwing the hinge into position, so you might want to find someone to help! You want to make sure you're using flush hinges if you don't want to have to chisel out any wood. 
I then lined the inside storage area with some fabric, just to give it a bit more of a finished look. I have to admit, I'm not the best when it comes to fabric related DIYs (oh so fiddly!) so mine is a little rough and ready. But hopefully you get the idea and you can potentially improve on it, if you can. I've just used stapled to hold the fabric into place.

As for the handles, I've just used a little bit of a ribbon-type material folded in half and stapled to the end of the slats, to use as a kind of tab. 

Step 10 - Sit back and Admire
Aaaaand you're done. Throw in some pillows, cushions and maybe a blanket for good measure. AND CHILL.


It took me a few days to build, although obviously being a blogger and taking photographs, I could only work during daylight hours aaaaand taking photos took up a huge part of my time. Yes, all these photos have been taken via tripod and timer which is quite a large faff to deal with on-top of the DIY. This room is most definitely still a *working progress* and you'll know all about my plans if you follow me over on Instagram. But it's definitely now a useable space, rather than just four walls and my vision for the room is coming together more and more every week. So I would love to know what you think, and I hope this inspires you guys to build something similar! And if you do, please do tag me in your pics - I would love to see! Costs: Pallets £9 Panelling £15 Strip Wood £3 Skirting £9 Corner Bead £8 Hinges £3 Fabric £12 All Nails, Screws etc were free from previous DIYs. Paint kindly provided by Valspar Total: £59 Watch the Video.... *Paint was kindly provided by Valspar for this project. As always, all words, thoughts and opinions are my own. Thank you for supporting the brands who support this blog! from http://www.kezzabeth.co.uk/2018/02/diy-pallet-bench-with-hidden-storage.html 
One thing our house is seriously lacking, is decoration. And by that I mean walls that aren't completely bare or rooms that aren't sparsely filled with oddly placed furniture. None of our rooms have that cosy homely decorated feel to them. Renovating is one thing, but then turning a room into comfortable well-furnished, well-decorated and well-designed space is another thing. And that's something we definitely haven't achieved yet within our home.
There's two simple reasons for this really. 1 - Decorating and furnishing is expensive and 2 - our funds are always needed elsewhere (ie more plasterboard) so we never have the money anyway. This year however, I decided that I needed to get a bit more inventive. So, I have a few ideas lined up already and I thought I'd share one of them today. A wall ladder art thingymahbob. OK I don't know what the hell to call it - a ladder that's on the wall, used kind of as a shelf. A kind of feature art. Making sense? (How I decide on a title for this post, I don't know....)
I'd seen this idea on pinterest quite some time ago although the ladders I had seen were filled with books in a more practical kind of idea than what I had in mind. I wanted my ladder to be a kind of decorative piece of art. A prop to display more art and random eclectic bits. A ladder to add to the vintage vibe I'm trying to achieve within our home. Quirky, fun, budget and cool.
Step 1 - Find Bargain Ladder
I've been eyeing up some secondhand ladders on eBay for quite a while, but I wanted to find one at the right price. The term "vintage" adds value to an item - however when things are vintage, but not listed as vintage - well then you're winning. eBay (and other online marketplaces) is very much just a waiting game, and finnnaaally after a few months of waiting, a PAIR of vintage, (but not described as vintage) ladders came onto eBay local to us at just £7.50. Nobody wants to use wooden ladders as actual ladders nowadays (let's face it they're not the safest, most stable or most durable) so they weren't likely to be very sought after. And since they weren't listed as vintage, they were even doubly less likely to be searched for and I won both ladders - hurrah!

Step 2 - Fit Said Ladder into Tiny Car
I was chuffed to bits to win these ladders - only small problem, at over 3m in length they were never going to fit in the car. Well I'm not the kind of girl to let that stop me. So of course I turned up at said random eBay mans house with a handsaw ready to chop the ladders in half. I say *I* what I actually mean is, I explained to the poor man what would be happening and made Grant do the dirty work. And it wasn't quite cut in half either - more, just took the tips off. Needless to say though, the poor guy was slightly baffled and perhaps somewhat disappointed that we literally chopped up his ladder right before his eyes. BUT, it was all in the name of Art. And when he asked me "Are you artists?" Well obviously I said yes. Yes we are. Artists of the renovation game and how to get the most out of your tiny car.


Back home with two ladders and I instantly put one to use in a kind of practical way with our giant log stack. You might have seen this one already - but if not, here's where you can find out what I did with that one. And as for the other ladder...
Step 3 - Find Appropriate Brackets
I had grand plans that involved hanging the other ladder horizontally on the wall as a kind of decorative feature art/shelf. I just needed to find the right brackets first. *Normal* ladder brackets were too ugly, anything else for an actual shelf was too wide, but eventually however I stumbled on Bob. (Find Bob here: Bobs Brackets). He makes handmade metals brackets, ones specifically for ladders, to any size. Thank you Bob! At just £5 per bracket and an additional £5 postage, these were just as affordable as all the other brackets I had looked at, but these were about 1000x more stylish AND they're handmade too. I love supporting small businesses and this guy's stuff is right up my street. He does scaffold brackets too, so I highly recommend checking his site out!


Step 4 - Attach!
With such a large beastly ladder to hang, I roped Grant in to help. We positioned the ladder centrally on the wall and lined the brackets to be attached next to the second rung on either end of the ladder. We actually attached one bracket first and we were then able to check the ladder was spirit level straight before marking up the second bracket. To save our freshly painted walls from getting stained from brick dust as well, we also attached an envelope beneath the drill to collect the dust. 


Step 5 - Decorate and Admire Et voila! Once it was up, all that was left to do was to decorate. Well here's where I haven't *yet* finished, but so far we have a few bits in place. Which is mainly collected art prints from our travels, but there's also a tile we bought from Portugal, the giant antique keys I picked up at an antiques-fair years back, a random light-up star, vases and even a F&B colour card. I want it to be filled with an eclectic mix of random stuff, but stuff that also fits together. You'll notice there's something a little bit missing.... But as I say, it's certainly not finished. But I wanted to share it on here all the same - after all, if I wait until everything's perfect, well then I'll be posting this blog post about 10 months late. You'll get the idea anyway... 


Things Left to Do:
So I'd love to know what you think. Would you re-create this in your own home?! And do you have any suggestions for items to display? Costs: Single ladder - £3.75 Brackets - £15 incl. P&P Total: £18.75 from http://www.kezzabeth.co.uk/2018/01/diy-wall-ladder-art.html |

AuthorHi I am Jaclyn Ross 28 years old and I am a project manager for a construction company we install basements and do central ac as well as insulation. ArchivesCategories |


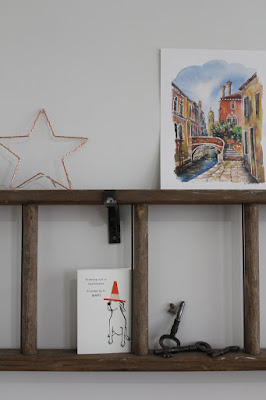

 RSS Feed
