
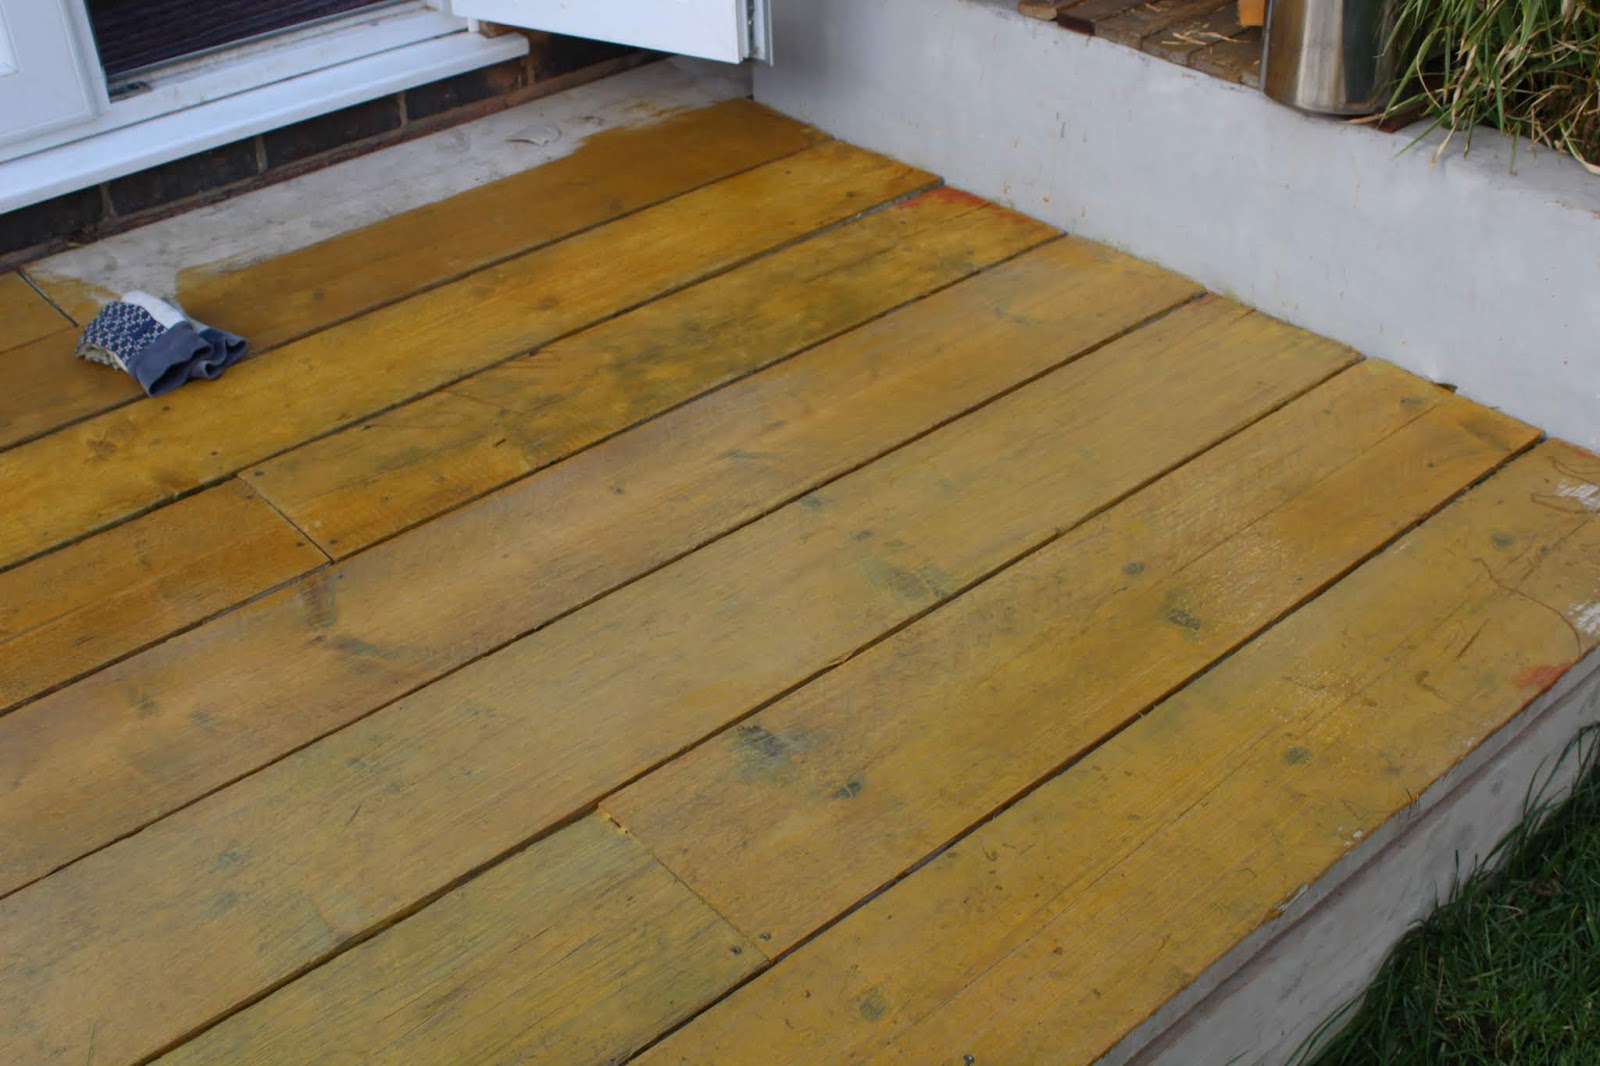
Our conservatory is a bit of a marmite room. It's a very old conservatory (built in the 80s) that heats up to about 1000degrees in summer and then freezes to about -1000degrees in winter. I'm exaggerating, but you get what I'm trying to say - it's not a perfectly formed extension. It's what typical 80s conservatories are known for; being a tad impractical.
Despite that, knocking it down seemed like a total waste since we would only have gained a tiny extra bit of space in the garden. I think having it as a living space is actually more beneficial, plus, I'd always wanted a conservatory. It might not be the conservatory I had dreamed of, but I certainly wasn't letting it go!
Read more »from http://www.kezzabeth.co.uk/2018/09/creating-indoor-garden-room.html
0 Comments

If you follow me on Pinterest, you may have seen I've been pinning a ton of attic conversion ideas over the last month. We might still be a long way from beginning any work up in our attic - but a girl can dream right?! Anyway, in my mad month of pinning, I came across some simply awesome staircase ideas. Ideas that make you want to rip out your existing staircase and fit a whole new one. In collaboration with Fontanot Shop, an Italian-design staircase manufacturer, where you can buy contemporary staircases, I'm sharing some of these awesome designs with you. From elaborate luxury designs to simple DIYs, whether you're looking to buy a new staircase or make simple alterations to a current one - I've got a whole heap of staircases to wow you with. So, if you've got a thing for staircases (you will have by the end of this post!) then, check these awesome designs... 1. The Floating StaircaseI absolutely love this idea! These kinds of staircases take up a lot less room than staircases which are 'boxed in', leaving a room to feel more spacious, lighter and brighter and not to mention, make an absolutely stunning feature. Particularly so when paired with lights, such as in the image above. For this design to work, you would need to ensure the wall the stair treads are hung up on is strong enough to take the weight. Otherwise, the design and installation are relatively straightforward and can really bring the 'wow' factor to a room. 2. The Spiral StaircaseSpiral staircases, or otherwise known as circular staircases are great where space is limited. Their design means they don't need to take up a large amount of floor space beneath and they can fit into simple vertical spaces, without the need for a large area to incline. For small houses, this type of staircase is a particularly a good option. Spiral staircases can suit both industrial, modern and classic spaces due to their wide range of styles. I think they're quirky, add a bit of fun and can make a really interesting feature within a room. 3. The Glass StaircaseIf you want to simply refurbish an old staircase, adding glass sides is a brilliant way to make an upgrade. It will add tons more light to a room, particularly if your hall or landing has no natural light. It will also open the space up, give a real contemporary modern feel to the room and will add a touch of luxury as well. The only downside to having a glass staircase is that you might find yourself wiping fingerprints off the glass a little more often than you'd like. 4. The Staircase with a SlideIf you want to add a bit of fun to your house, how about incorporating a slide into the stairs? This would be a child's actual dream come true, but let's face it - even adults could have a bit of fun with it as well! A staircase with slide doesn't have to be expensive, in fact, there are loads of great DIY tutorials out there showing you how to adapt an existing staircase to suit this design. I've got to say, I would certainly give it a go! 5. The Bookcase StaircaseThis is probably my favourite design. How to incorporate storage within a staircase, in a really simple and effective way. This idea might not be for everyone, but if you like the eclectic design and of course a good book, this would certainly make a unique feature! 6. The Staircase with Pull-Out StorageAnother great solution for maximising storage space. Pull out drawers! Perfect for storing away shoes and winter knitwear whilst having all those things right on-hand when needed. Because who doesn't sit on the stairs whilst putting on their shoes? This design might take some clever planning and would need to be well thought out, but I think this is an ingenious idea that all staircases should have. 7. The Ombre & Patterned StaircaseOn a budget? No problem. Painting a staircase is really simple and easy way to add style and give it a whole new lease of life. I absolutely love these ombre and patterned staircases. You can be as bold and as daring as you want, with vibrant colours and punch patterns. Or you can opt for something more simple and understatement, like colourful spindles. I think this is definitely something I would consider for our own house! How about you? So that's it! 7 staircase ideas to add a bit more style and impressiveness to your home. Which one's your fave? *Collaborative Post from http://www.kezzabeth.co.uk/2018/08/7-creatively-awesome-staircases-ideas.html 
Being a DIYer means I have a fairly large amount of tools, but - I don't any tools quite as stylish as this one! VonHaus have recently just launched a whole collection of new rose gold tools, targetted at your average DIYer and Upcycler who want their tools to look as good as their projects. 'Cause let's face it - why shouldn't tools look good? So, I've been sent their new cordless electric screwdriver set to put to the test - and whilst I LOVE the rose gold colourway, I was really intrigued to see how well it would perform as an actual tool. Because obviously, a tool needs to actually work and not just look good. So, first things first - let's talk about the colour. I already said I love it, and I really do. I am quite partial to a rosy-pink, which I'm sure if you've followed me for a while (particularly on Instagram), you might know. Although I have to say, I wouldn't quite describe the body as rose-gold so much, but more of a very light nude-pink. The colour is subtle, in a good way and it looks sophisticated. I think one of the worries with having a pinky coloured tool is that it could appear a little child-like and almost fake. But, I'm pleased to say this doesn't. 
So it comes in this clear case, which I really like - I feel as though it's been designed to show off the tool, even when it's not in use. All the other tool cases I own are stored in basic black fabric bags, which I then have to open each time I'm looking for a tool - cos they all look the bloomin' same! This is stand out, different and almost makes a tool-shelf trendy. I mean, I may need a few additional pretty tools to go with it, but I love that's it's eye-catching and it looks gooood. 


So the case isn't just to stylize your shelf with, it's super practical for storing all the different screw-bits it comes with as well, and there's a whopping 50 of them! I'm pretty sure I now have every single one I could ever possibly need. But I also like the fact they each have a 'slot' to fit into and keep them organised, unlike other storage items I have where they'd be rattling around in a loose tin. (Yes, this drives me NUTZ). 

So, let's talk features, 'cos looks ain't everything. Luckily though, this cordless screwdriver definitely doesn't disappoint. It has 15 different torque settings and a drill mode. If you're not familiar with torques, the lower numbers are generally for smaller screws. The higher torque is when you need more 'oomph' to drive in, which is generally for tougher wood and bigger screws. I've used this tool on some long screws already and I'm not going to lie, I had my doubts about how good it was going to drive a screw in - but guess what, no problems! 

Having the torque settings is absolutely fab because some of the cheaper cordless screwdrivers don't have this - which can surely only lead to stripping a ton of screw-heads. Whilst it does also have the drill setting, I do want to mention that isn't a substitute for a drill. You certainly won't get far drilling into brickwork with this, but it will do you fine for plasterboard and softer wood. Changing bits on this screwdriver is super simple as well as it features a quick-release chuck. You simply pull down on the chuck to release and insert new bits. There's no separate tool to wind them in and out like you might find on some older or basic drills. 
My favourite feature though, without a doubt is that this tool can change positions. And by that I mean, it can turn from this, into this... 

Nifty huh? Actually, I can't tell you how bloomin' useful this is. It means you can get into certain spaces better, you can use your weight on it better when required and you can even use it as a manual screwdriver when the battery dies (yep, done that). It's a really clever little feature, that I think, is a stroke of genius. Did I mention how much I like that? 

The other clever little feature is a torch! Yep, on the bottom of the tool is a torch with on/off button. Again, I really like this feature - I've often found myself in dark spots trying to screw something, so I actually think this also going to be quite useful. And of course, you also just use it as a standard torch when you need one too. 
So, my verdict overall, is that it's a pretty good tool. Pretty and good - see what I did there? This might not be the tool for heavy use tradespeople, but for moderate to basic DIY usage, I think it's great. You could easily use this for flatpack, changing knobs on furniture, or just simple DIY building and crafting. It would make a great gift for any new homeowner or DIY hobbyist too. 
The way I've been using this tool personally is in conjunction with our drill. In the past, I would constantly be changing between drill bits and a screw heads on the drill, which is not only a massive faff but a massive time-waster. Having this cordless screwdriver as a side-kick has been a game-changer. I can now just switch between tools, and I don't have to worry about misplacing the bits. I'm expecting to get a lot of use out from this little tool - and I'm sure you'll see it more over on the blog too. If you want to buy this screwdriver or check out the other rose-gold tools from VonHaus, you can find them all on Domu.co.uk. And you can find this particular rose gold screwdriver here, which retails at £19.99. I think it's pretty reasonable value considering all the features and extra bits you get with it - and of course, it's a lovely shade of stylish pink. So, what are your thoughts? Are you swooned by a rose gold tool, too? *The cordless screwdriver that features in this post was sent to me to review. As always, I only recommend products I genuinely like and would buy myself. All words and opinions in this post are my own. Thank you for supporting this blog :) 
from http://www.kezzabeth.co.uk/2018/08/vonhaus-rose-gold-cordless-screwdriver-review.html 
I'm super excited to be collaborating with Skylight Blinds Direct on this post today and giving away a £50 voucher to spend on their online shop! Whether you already have a roof window you'd like a new blind for, or you're renovating and have grand plans for putting in new roof windows, this giveaway is for you!
If you haven't heard of Skylight Blinds Direct before, then I definitely recommend checking them out. They essentially create blinds that will fit all major roof window manufacturers. All you need to know is the make or your window and the window code. And if you're not sure, don't worry - there's an easy to follow guide that explains exactly how you can find out! And if you have a very old or bespoke sized window that isn't on their list, then don't worry, they can also create bespoke made-to-measure blinds too! From blackout blinds to waterproof blinds to even motorised blinds, their website offers a blind for every room in a variety of colours and some patterns too. So, if you'd like to bag yourself a £50 voucher to put towards a roof window blind, then all you need to do is fill in your details into the Rafflecopter form below. You can gain several extra entries by completing extra tasks too if you'd like - all the info is in the widget below. The giveaway will be running for 3 weeks, and the winner will be chosen at random, so good luck!!

from http://www.kezzabeth.co.uk/2018/08/win-skylight-window-blind.html 
I can't believe we've been living in this house for four years already! It seems absolute madness and in many ways makes me realise how far we haven't come within our home renovating journey. I mean, four years and we're barely halfway through?! But I guess that's the reality of DIY renovating and renovating on a serious budget. Tough life, eh?
Despite being far from finished, over the last 12 months, a lot has happened. We've finished the kitchen entirely (well, 95% finished - but that counts as finished right?!), we've finished the dining room entirely (well, 95% again) and we've made tons of progress in both the conservatory and the living room. Not to mention the garden has changed quite a bit too. So, that's five different areas of the house in 12 months - not bad! And, I think this is the first year the house is actually beginning to feel and look like a home.
So, this post is basically going to be a kind of 'up-to-date house tour' showcasing where we're currently at in our home reno journey. I do this post every year, so if you want to see how our journey has unfolded year on year, you can check out each of these posts for the last four years right here:
Year 3 Update (Last Year)
So let's start at the beginning, shall we? I'll walk you through the house, in the order of the rooms, you would meet. I haven't styled any of the rooms for this shoot, what you see is what you get (sorry!) and it was on a bit of a dark day (mistake!).
The Hallway
This room is unchanged as ever! Actually, we anticipate this will be the last room we possibly ever tackle, so it's barely changed in four years and I don't see it changing much any time soon. But I mean, it's not that bad, right? *said through gritted teeth*


The Living Room
This room has gone through quite the transformation this year. I've sanded floorboards, stripped wallpaper, repaired the ceiling (ish) and bought a whole new secondhand sofa. Let's just say this room is probably the most changed room over the last 12 months. We've taken a break from it for the summer, but we hope to finish it later in the year! If you want to see all the progress made so far, you can find all my living room posts here.


The Kitchen/Diner
Last year at this time, we only had half a kitchen. We still didn't have a working sink, a proper tap, or a worktop along the right-hand side of the kitchen. We basically had run out of cash and had to wait to save for the last missing piece. A whole year on, it's DONE. OK, the hanging lights are still out of place and we still don't have shelves - but other than that, it's done. And it feels good! You can see the full kitchen tour here.

The dining room is also finished, albeit with a plug and light switch still hanging out the wall. But it's done, it's furnished (although I desperately want to build a new table) and it's a room that's finally nice to be in. For three years, this was just a space we walked through; it lacked purpose and we never had somewhere to sit when we ate. Oh, how life has changed in the last 12 months! I've almost forgotten those days... almost.

Conservatory
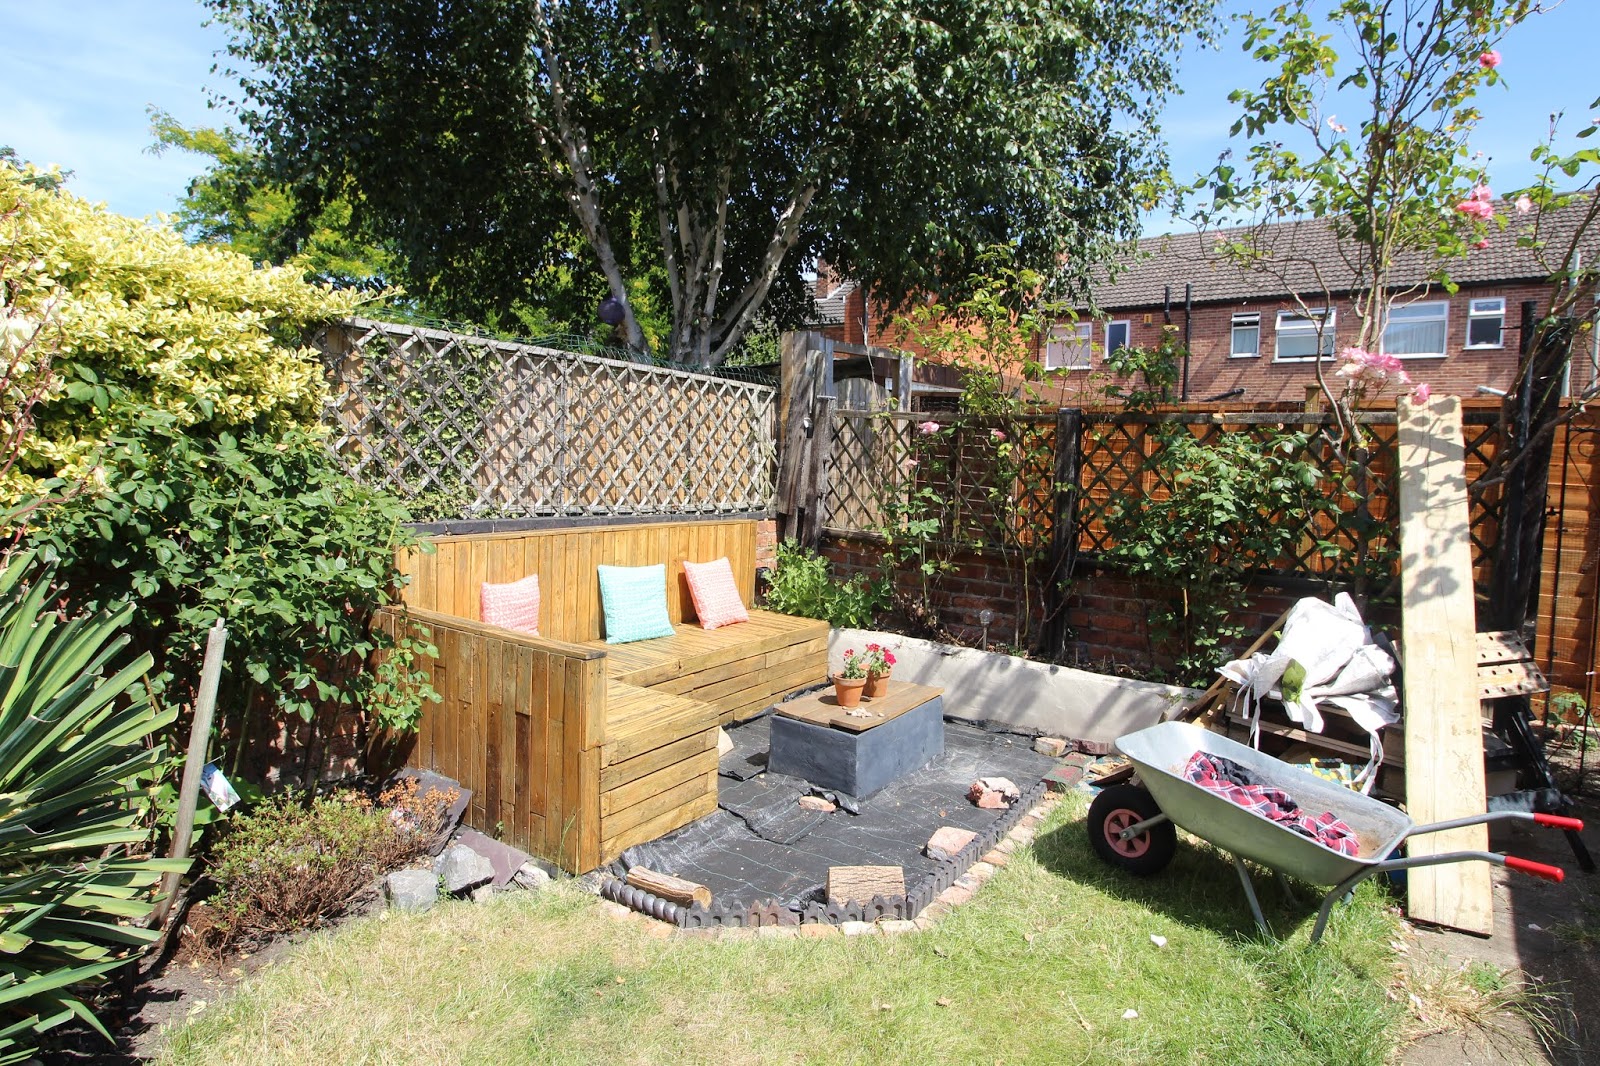
Well this room has also undergone quite the transformation! Last year I painted the floor on a whim since we had zero budget and I felt like we needed to up the pace of renovating a bit. It's definitely added a punch of character and it's held up pretty well for the most part too. The only issue we've had with the painted floor was during the change from colder to warmer weather, which has lifted up some paint near the air vent - but luckily you can't see much of that. More recently, I've built the pallet seating in here too, which I had been planning for YEARS! And my vision of a garden room conservatory with plants galore is finally taking shape. There's still much to do in here, but I'm really pleased so far.

The Basement
The secret room I very rarely talk about! I am so desperate to get my paws working down here. But, it's going to be expensive and we currently have no money. We have ventilation issues we need to sort out, and I don't want to rush into anything and make the wrong decision. So far, I haven't researched enough to begin work down here - so it basically looks exactly the same. Well, aside from the stack of pallets mounting up. I'd like to start sooner than later with work down here, but we'll see...


The Landing
Another room that totally hasn't changed. We even still have stuff in moving boxes from 4 YEARS AGO. Seriously when does it end?

Bathroom
This was the first room we ever tackled and it doesn't look too different now. I'd love to update this room a little because we never quite got round to the 'finishing touches' stage and it feels a little empty and unloved at times. I'm also not digging the cream walls and we STILL have skirting boards missing in places and a cupboard without a door. But, meh. We have a place to shower and pee, that's what counts right?

Smallest Bedroom/Office
We use this room as an office, although it doesn't actually see that much use. It hasn't changed at all this year really. Again, I'd love to furnish it better - but there's never the money for that. The negatives of forever renovating eh?!

Master Bedroom
Four years on, and this room is another one that's completely the same! From the curtains to the floor, we're still rocking dear old Edna's retro style. Will it be on the to-do list for next year? I kinda hope so. It would be nice to one day not wake up amongst this dark mess!

Attic
At the start of this year, we got rid of SO much rubbish from up here. Stuff we'd been keeping *just in case* - but we had kept it long enough, it needed to go. We burnt a load of wood in the wood burner and took a load more to the recycling centre. It still doesn't look tidy or empty, but it's a great deal better than what it was. This room isn't a high priority on our list, although it definitely need attention sooner than later.


Garden
I've been tackling the garden since day one of moving in! It looks SO much different to how it looked when we moved in and it even looks different from how it did 12 months ago. We've added decking, gravel, fencing and the rubble is almost gone. 4 years of work out here is beginning to pay off. We're not finished yet, but the end is certainly in sight. And we're hoping to have this area ticked off the to-do list by the end of next summer!


So that's the house in 2018, and our four-year houseiverasy update. Yes, I wish we had achieved more - but that's probably always going to be the case. And I think this year has been quite a good one, so I feel good about that. Here's to another year of hard work, ha!
Anyone else on the same long renovation journey out there?! Please come forward and make me feel better ;)
from http://www.kezzabeth.co.uk/2018/07/4-years-on-our-home-reno-update.html 
If you've followed me for a while, you'll know I've never had much desire for gravel in the garden. Don't get me wrong - I don't hate gravel and there's certainly a time and place for it, but after having an entire yard full of gravel in the old house (full garden tour here), I was against doing the same this time around. And for a long while, I was pretty adamant about that. Sadly though, our budgets aren't big enough for my dreams and now we've lived in this house for four years (yes, FOUR years), I'm beginning to realise I need to adapt some of my hopes and dreams and reign them in a little. I mean, none of our plans are insanely expensive, but they could always be cheaper in some way or another. We've now been working on our garden renovations since we moved in, back in 2014. I ripped apart the entire garden in a matter of weeks; and since then we've transformed it with a new lawn, a pallet sofa with firepit, scaffold decking and most recently, slat fencing. (You can check out all my garden reno posts here) But as a whole, the garden is still far from finished and the biggest eye-sore has been the old concrete path that runs the length of the garden. 
The plan was initially to use part of the path as a lower-patio against the decking for a sit-down area of table and chairs. Then, reduce the width of the rest of the path for a wider lawn instead. I had always envisioned some beautiful dark limestone slabs, but, the cost of this would have been insane. Spending that much money just didn't seem right when half our house is incomplete, and despite my best interests of finding something cheaper, or secondhand, it just didn't happen. So - along came the idea of gravel. Gravel requires little-to-no extra materials, it's inexpensive to buy and can make an instant transformation in a matter of minutes. The negatives, however, are that the dogs are likely to kick it all over the place, it's not an easy material to sweep leaves and other debris from, and you obviously can't walk on it barefoot (oh first world problems!). But, after searching the hashtag #gravelgarden on Instagram for hours, I was completely sold on the idea. Especially as we could buy a large bulk bag and use the extra around the pallet seating corner too, which has been unfinished for the last 3 years. The positives far outweighed the negatives, and it just made sense. So that's what we did. Here's a couple of 'before' shots.. 

Choosing a GravelThe gravel we used in our old house was Cotswold Chippings, which is a fairly consistent shade of light cream and has quite a modern feel to it. Despite really liking them, they did go a little green in places over the winter and I wanted to do something different in this house anyway. This time around, I wanted something with a more mix of colours to it, but at the same time still light and modern.I found a few websites that offered gravel samples, but the one that stood out as the most affordable (some websites wanted to charge £5 per sample, would you believe?!) along with reasonable prices for bulk bags and delivery, was The Stone and Garden Company. I ordered two samples to keep my choices minimal and I eventually decided on 20mm Yorkshire Cream, which is shown as B in the photo below. The other one in this photo is a 20mm Quartz. 
Fitting Gravel Board and Edging TilesThe first step to gravelling the garden was to fit some kind of edging around both the pallet seating corner and lower-patio area so that the gravel would be partitioned from the grass. The last thing we want is gravel all over the lawn (and the dogs are certainly prone to kicking it about!) so a good edging will help against that.For the pallet seating corner, I re-used some of the original Victorian Edging tiles that were in the garden when we first moved in. Some of them aren't in the best condition and I've had to mix and match slightly, but I figure it all adds to that period charm. I've also used some leftover bricks with them too, just because I like the look of it. I think it works and looks really good! 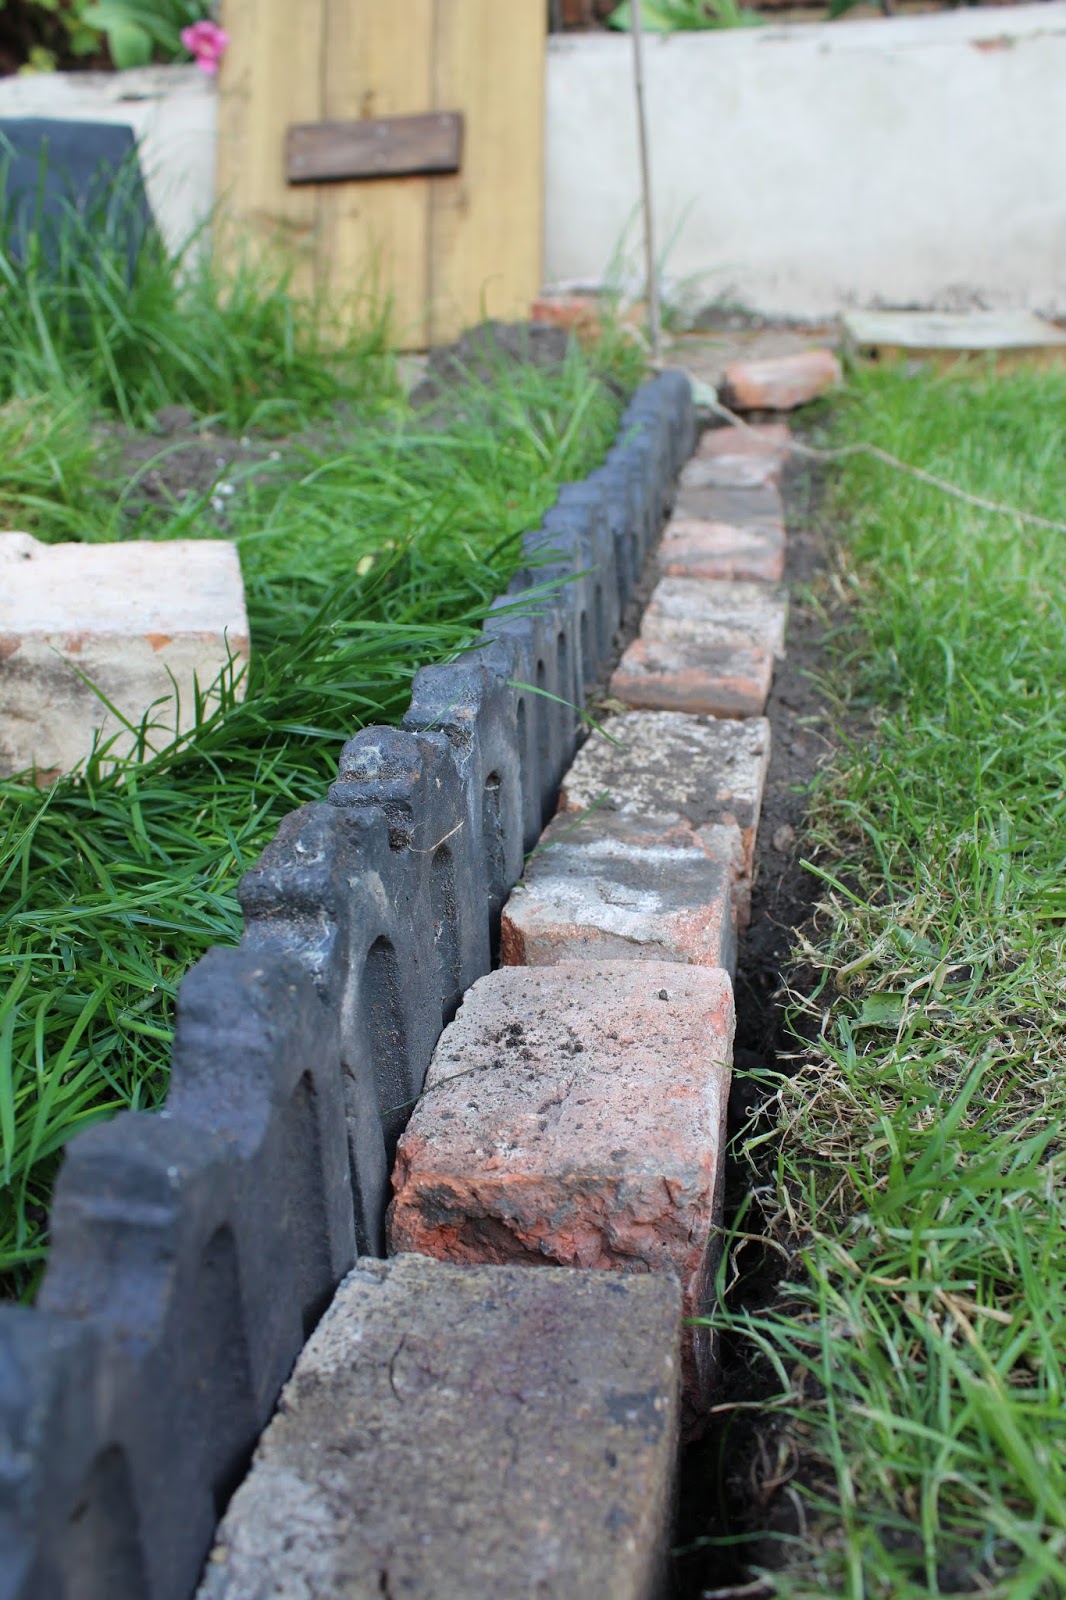
I'll give you a quick talk through the process, but it was seriously simple. Like, zero DIY skill involved. 
I laid the bricks out in the rough shape I wanted to create, then used a string line to properly mark it out. A string-line will help to keep you keep going straight when it comes to putting it all together. 
Then, I simply dug a trench to slot both the edging and bricks into. Simple!


Finally, I back fitted the gaps with mud and voila, one reclaimed brick edging! 

Not bad huh? As for the patio area, I wanted something a little less decorative, so I decided to use a gravel board instead. It's super cheap and once fitted is barely noticeable. I fit the gravel board in exactly the same way, digging a trench and slotting it in. Super simple, although both areas did take a couple of hours to do. 
Laying Down Landscaping FabricI see so many people just chucking gravel down willy-nilly here and there and in a matter of weeks, weeds are popping up all over the place. You can lay gravel down on-top of anything, but if you want a decent finish that won't turn into a weedy-hell, you do need to prepare the area first.If you're laying gravel onto soil or cracked concrete where weeds may grow, I thoroughly recommend using landscaping fabric underneath first as this will completely block out the light to them. We always use the heavy-duty stuff because it's far more durable, which is really important when using under gravel as normal weed fabric will tear and rip apart within a matter of weeks. And don't worry - it's completely permeable so it won't turn into a swap either. You can peg the fabric down into the soil if you'd like, but otherwise, the gravel should hold it into place, so all you need to do, is cut to size and lay. Here's Doug modelling it fabulously. 

Laying the GravelWe ended up ordering an 850kg bulk bag of Yorkshire Cream gravel from The Stone and Garden Company, as I mentioned earlier, for only £85 (and including free delivery would you believe?!) which meant we had a lot to sift through. Since our garden also has no access for pallet wheels, we had to have the bag delivered to just outside the back gate, on the adjoining road.So, we borrowed a wheelbarrow from Grants parents so we could easily transport the gravel from the bag to the garden, without taking years to do. We used a spade to fill the wheelbarrow up and then simply dumped the gravel where we needed it. 


I then used a scrap piece of wood to spread it around and make sure it was all fairly level. Our concrete is actually on a slope, so we've worked with that. 
We had so much gravel leftover, we even managed to add some to the back alley as well. This was something we had planned to do eventually, but we never expected to get it done with this single bag alone! Again, we have cracked concrete here so I laid out more landscaping fabric and simply dumped the gravel on top. Oh and I used more bricks to create an edging here too - they're not mortared into place (wouldn't be worth my time or money!) and some are a little rough and ready in places, but I think it looks good! Here's a before and after: 


For years this alley has been used as a dumping ground, so laying gravel here has made even more of a transformation than it has in the garden! Grant uses this alley almost daily for his bike, so it feels good to finally have it cleared out and prettied up. We plan on adding some solar fence lights in the future (Lights.co.uk have some particularly affordable ones I'm eyeing up!) and painting and repairing some of the fences too. But the later is probably a job for next year! Washing the GravelAfter we had laid the gravel, we needed to hose it down for its true colours to be shown. Bulk bags of gravel are usually quite dusty, so this covers the gravel until it's washed away. Here's a couple of photos for you to see the difference:

A Finished Look!And that's it! It really is that simple. So here are some finished pics for you to look at...


I am dead chuffed with how it looks, and I think it works really well. Sure, it's no limestone paving slabs - but you know what, I think it's a good rival! So, Would I recommend Gravel? OK, so cards on the table. The dogs have kicked it into the grass twice so far (UGH!) and twice already leads me to believe it will happen again, and again. So yes, that is flipping annoying and one of the biggest negatives to gravel. The pallet seating corner is already beginning to stack up with leaves and petals from the rose bushes which obviously I can no longer sweep away and will it soon turn into a leafy mess-pit I can't control? Only time will tell. And lastly, let's talk about the neighbourhood cats. Someone on Instagram warned me that cats love to use smaller sized gravel like a litter tray. I took note and avoided shingle type gravel - this one has much larger chunks within it. But guess what? I've already cleared up three lots of cat poop from the back alley! And it's certainly is not from the dogs, so yes, that is also another huge negative. I mean, who really want to pick up more poop?! BUT, all things considered, yes I would definitely recommend gravel. After all, if you're on a budget, it's the most budget-friendly quick-solution out there. There is literally zero hassle when it comes to installation and it's so bloody affordable! Let's face it - there's a reason we've used gravel twice now. I'm definitely pleased with it - I personally think the positives outweight the negatives, and you know what, if I ever can afford those limestone paving slabs for the lower-patio one day, this won't have been the biggest waste of money. We just need to sort out the rest of the path now... but I reckon that might be a job for next year. Watch this space! Costs (rounded to the nearest pound) New Tools Purchased: None, although we borrowed a wheelbarrow. Materials Used: Gravel Board x2 - £4 Landscaping Fabric - £20 Yorkshire Cream Gravel - £85 Total: £109 Other Items Featured: Parasol - IKEA Table & Chairs - Argos Lantern Lights - Last year, Lidl Outdoor Cushions - Homebase from http://www.kezzabeth.co.uk/2018/07/laying-gravel-in-garden.html 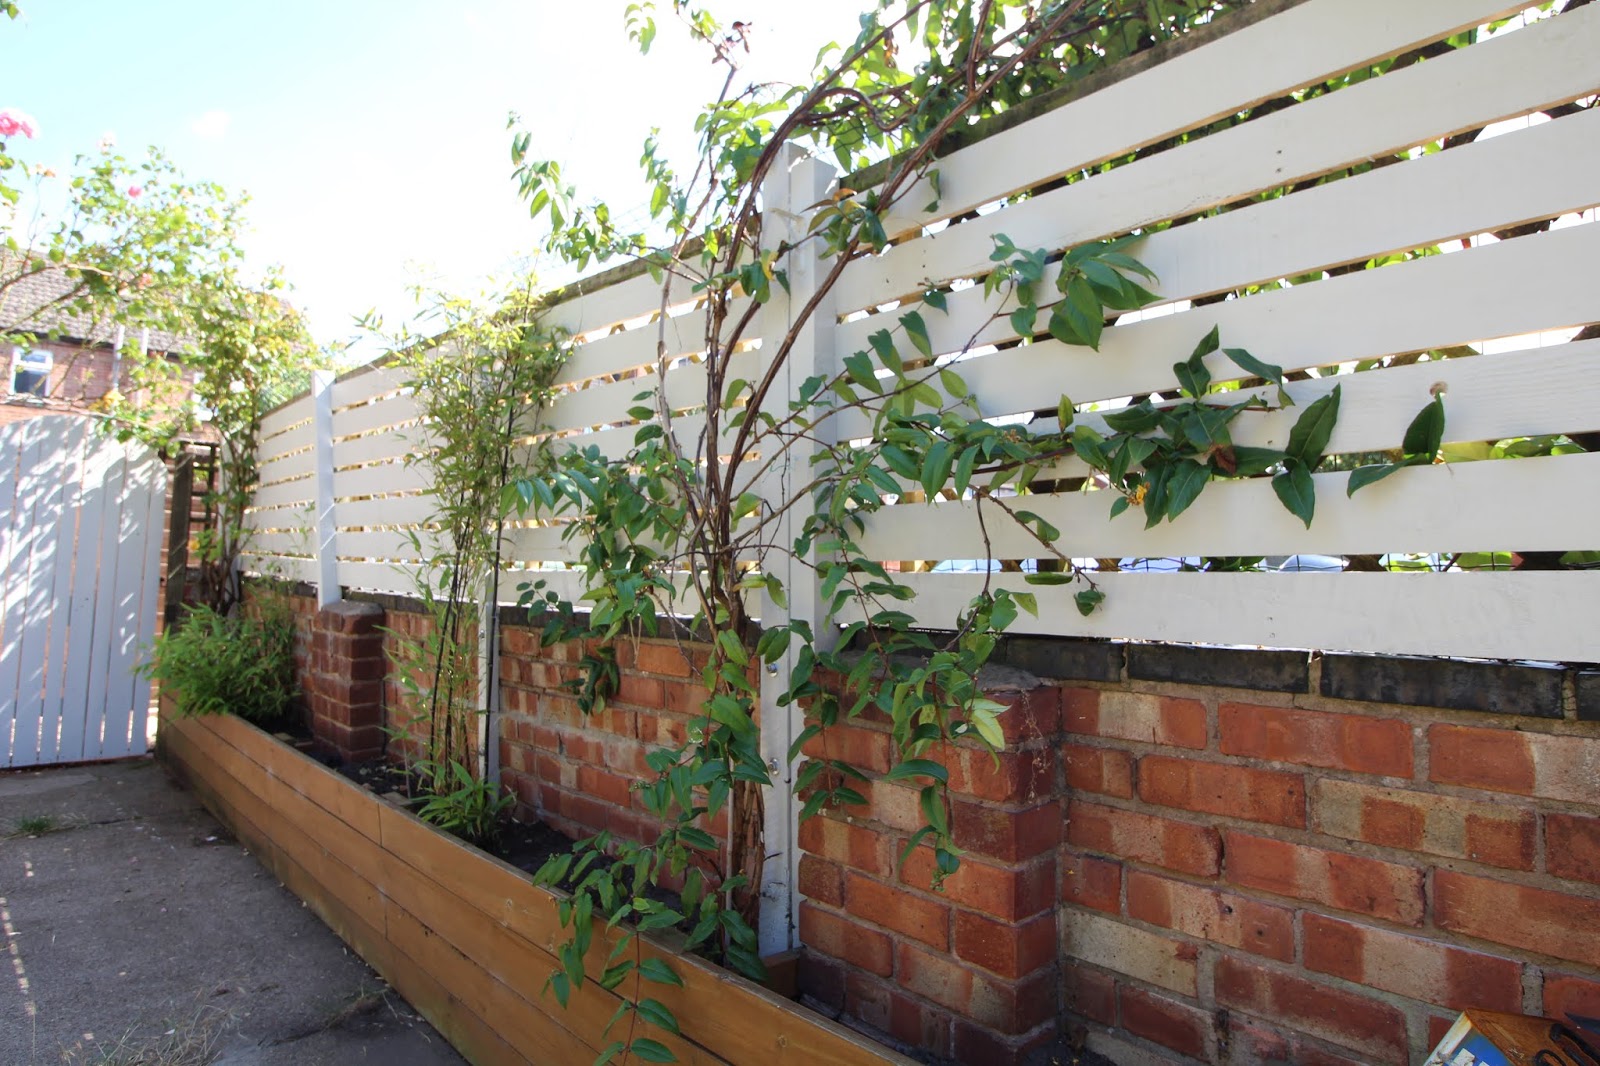
3 years ago I built a raised bed in the garden against the low-level brick wall between us and our neighbour. I built it with the intention of growing some climbing plants that would block out the view of the next-doors driveway (and the adjoining road) and give us a bit more privacy. Well, that didn't work out. Actually, I tell a lie - it did work out, but it worked too well. What I mean is, one of the climbers I had picked (a Solanum Crispum I believe) was on a mission to take over the world. It grew wilder than wild, quicker than the speed of light and basically became a nightmare to control and ended up being more of a pest than anything. So last year I dug it back up and decided I needed a new idea.
My new idea was pallet fencing. Three years ago I was totally against the idea of fencing - I don't know why? I think it's perhaps because I like the idea of continuity around the garden, and on the opposite wall we have some lovely large shrubs that act as privacy all on their own. I thought I could re-create the same effect on this side, but it turns out I couldn't. After our neighbours (on the shrubbed wall side) added additional fencing to some of the more sparse areas of foliage, the garden matched no more anyway and it gave me the perfect opportunity to put fencing up.
But, fences are expensive and because I like to save money, I decided to do something a bit different. Cue - pallet fencing! And of course, I'm going to show you how you can make your own and save a ton of ££ too!
You Will Need:
First things first, here's a quick look at what we were personally dealing with. We have low-level walls with a kind of trellis over the top (these were already here when we moved in!) which are attached to fence posts. After moving in, we added reed-screening for additional privacy, but that has since fallen down and it's now all looking a bit scruffy.
We'll be keeping the trellis in place to build on top of, but you definitely don't need one in order to complete this DIY.
So here's what we did....
// (adsbygoogle = window.adsbygoogle || []).push({}); // Step 1 - Affix New Posts
Whether you're adding fencing to the top of an existing wall (like us!) or not, you will need to have some fence posts in place, as this is how we'll be affixing the pallet planks in position. If you already have fence posts in place, you can skip this step altogether.
If you don't, and you also don't have a brick wall like ours, you will need to dig into the ground, pop the post in and secure it into position with postcrete. I don't have a blog post for that (yet) so you'll have to check out this video for help on that.
If you have a low-level brick wall like us - the good news is that you can just affix the posts onto that. We already have a fair few in place anyway as that's how our trellis has been installed, but we needed to replace a couple and we're also adding a few more to support the trellis even further. We're actually not taking the trellis down (seems a bit of waste?!), so we'll be fixing our pallet planks on top of it instead.

We used two methods to fix our new fence posts to the wall. One of them involved drilling a hole all the way through the wall, inserting a threaded rod, bolting it in place with nuts and bolts either side of the wall, and then cutting the excess off from the rod, which you would need an angle grinder to do. This is how our existing posts are attached, however for this method, you would need access to the other side of the wall. Don't worry though, I have an alternative method if this one isn't for you! But, here are some shots of how this process looks...


For the simpler, albeit it slightly more expensive method, we used concrete bolts. These are basically special bolts which screw straight into the brick, no wall plugs required. Simply drill a hole the same width as the bolt, straight through the fence post and into the wall, only going as deep as the bolt will sit. Then, screw the bolt in!


You'll need to use a ratchet to tighten the bolt into the brickwork, and voila, your fence posts will be full secure.

Literally, it's as easy as that. We're super impressed with these bolts and can't believe we haven't used them before! I would definitely recommend for any outside projects.
// (adsbygoogle = window.adsbygoogle || []).push({}); // Step 2 - Sourcing Pallet Wood
The two best places I've found for finding free pallet wood is Facebook Marketplace and Gumtree. While there are a fair few free pallets to be had, finding a bulk amount of pallets which are all the same size is much easier said than done. If you're aiming for a consistent finish on this project or any other, mismatched free pallets isn't always the best way to go.
In which case, bulk sellers may be a better option as they usually have a large quantity of the same stock. Despite having to pay for them, it can still work out much cheaper than buying wood new from a DIY store. And of course, this way you can at least guarantee the planks will be of the same size. We buy ours from a farm local to us (who also dismantles the pallets and sells the wood separately) for 70p a plank, of 2m length. It's relatively affordable, although yes, I'd prefer it to be free! ;)
Another way to get free pallets is asking smaller businesses if they have any pallets going spare or are willing to sell you some on the cheap. After all, if you don't ask - you don't get! Our local Jewsons often give away scrap pallets from time-to-time.

If you need to dismantle any pallets, I recommend this Roughneck Lifting Bar tool. It makes the job a lot easier, but don't expect the pallet to fall apart for you; you will still need to use a fair bit of elbow muscle. ?
For this fencing DIY, I recommend the longer and bigger pallets. As obviously, the longer the slats of wood are - the fewer fence posts you will need! The photo above isn't the actual pallets we used for this particular DIY.
Step 3 - Cut Pallet Wood to Size
So as I mentioned earlier, the pallet planks will be attached straight onto the fence post, so you'll need to cut your pallet wood to this size. Simply measure the distance between the centre of one post to the centre of the next post and cut the planks with a saw.

// (adsbygoogle = window.adsbygoogle || []).push({}); //
We're actually fitting ours to the frame of the trellis instead so ours will be recessed against the fence post. We've added additional lengths of timber to the inside of the trellis frame with screws, and our pallet planks will attach to these. Hard to explain, but this is ours..


Step 4 - Affix Pallet Planks
You'll want to use either galvanised nails or galvanised screws to attach the planks, as these won't rust. Personally, I prefer the look of nail heads, but the screws are definitely easier to deal with.
All you need to do is simply pop a couple of those into either end of the pallet plank, straight through into the fence post. You'll want to make sure your plank is level with a spirit-level as you do this (although we've actually done ours level with the brickwork, which ironically is not level) and it's really as easy as that.
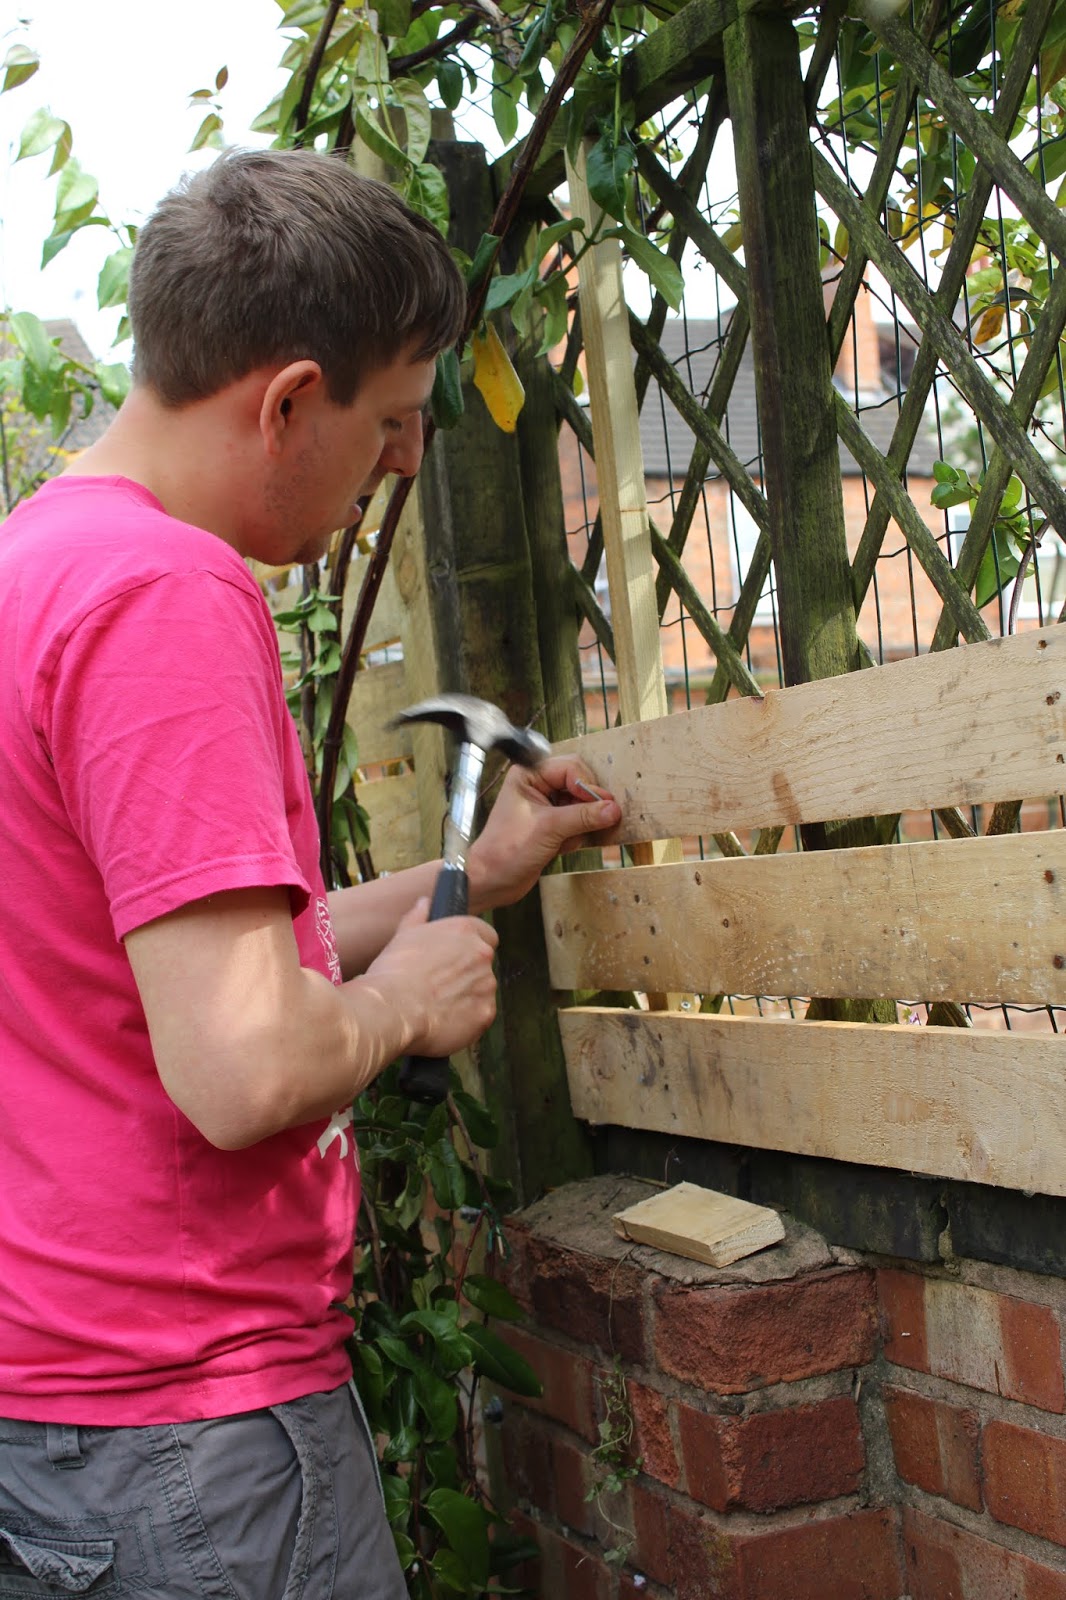
To space the pallet planks apart so that there's a gap between each of them, for the modern trendy look, you can just use an offcut of pallet wood to wedge between boards. This makes the gap a little over 1cm thick, which I think is perfect as it still gives you plenty of privacy.

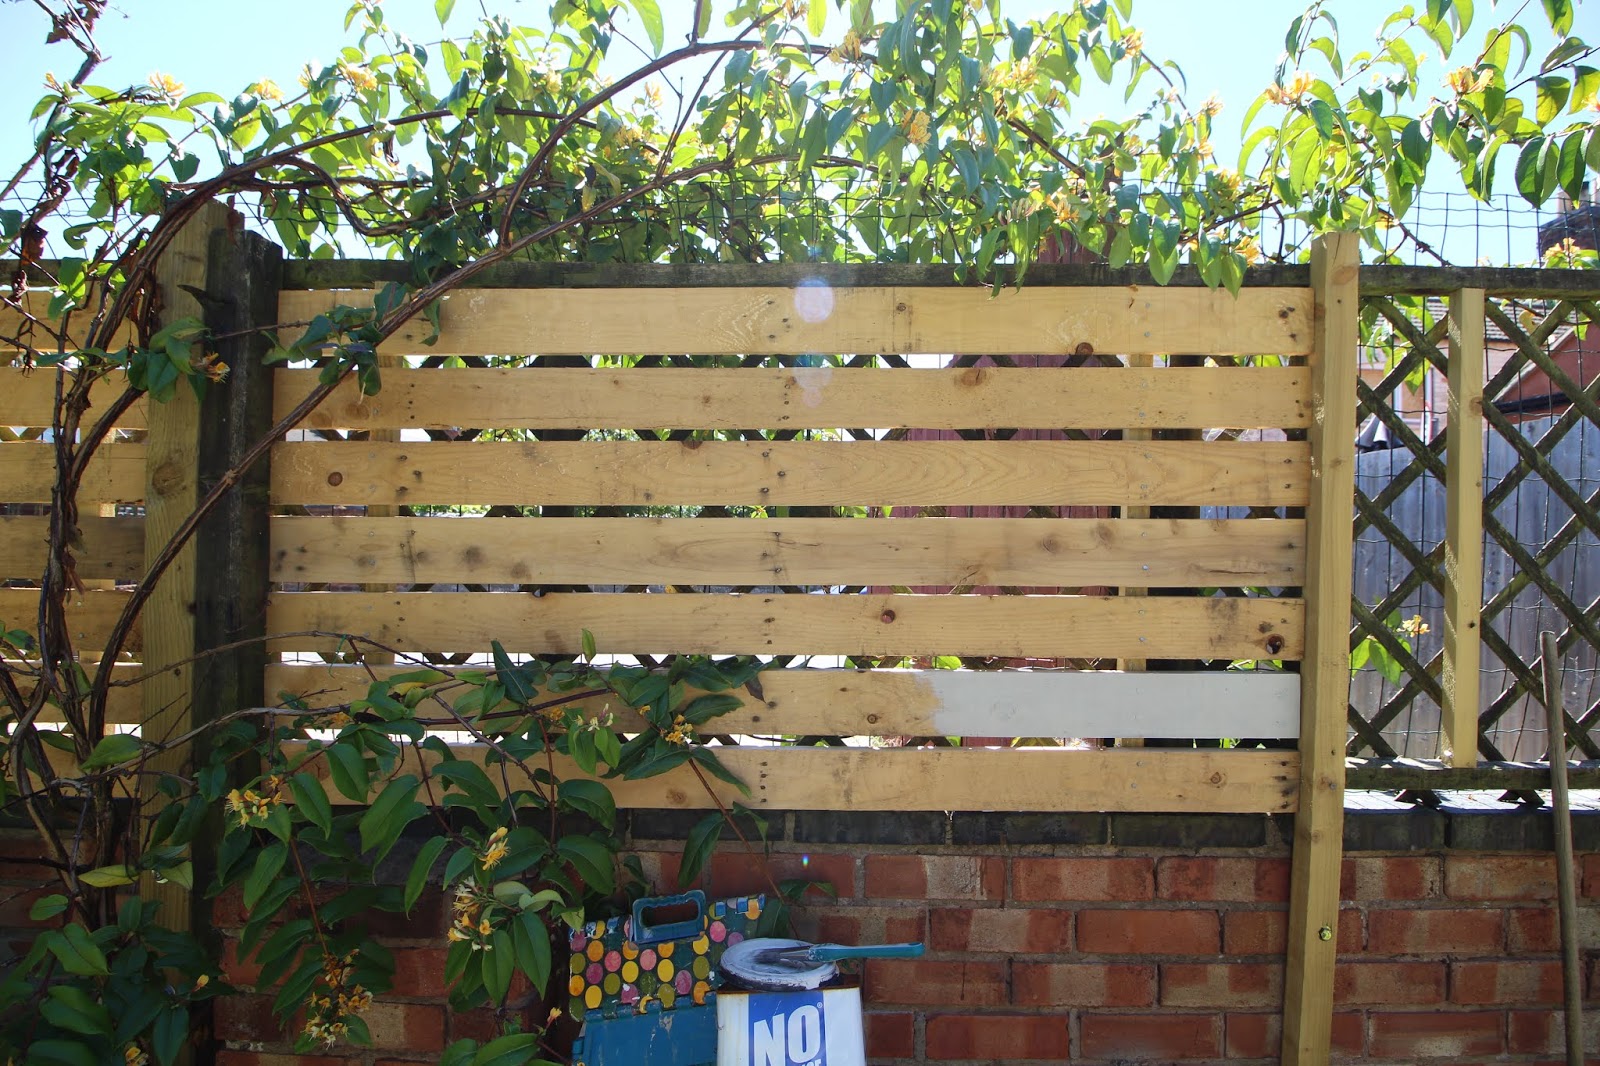
Looking pretty good right?! You can see how we've used pallet wood of a consistent width for an even-look finish. You could use varying widths for a bit interest though, it's totally up to you.


// (adsbygoogle = window.adsbygoogle || []).push({}); // Step 5 - Paint or Stain
Pallet wood doesn't usually need treating for outdoor use, but our boards were quite dirty and mismatched in tone, so I wanted to paint ours. I've used Johnstone's Garden Colour Range in 'Calming Stone' which is a kind of off-white colour with a hint of grey. It's much whiter than I anticipated actually, but it's added a really lovely fresh modern feel to the garden - and it's nice to have some painted wood, considering we have quite a lot of stained wood in the garden too.
I'd never used Johnstone's paint before but I really really recommend it. The coverage was amazing, you only need one coat for most wood and one tin went reaaaally far. Nothing lCuprinolinol which is watering as hell (sorry cuprinol!) I would definitely buy this one as a favourite in the future - and it was only £13.50 from Homebase!


And there you have it - one new pallet slat fence! We'll probably be doing this all over again at the back of the garden behind the roses bushes too, but not until they've finished their flowering season (we're sadly going to need to cut them!) and when we have a bit more cash to play with. For now, though, we have full privacy in the garden and I'm loving it!


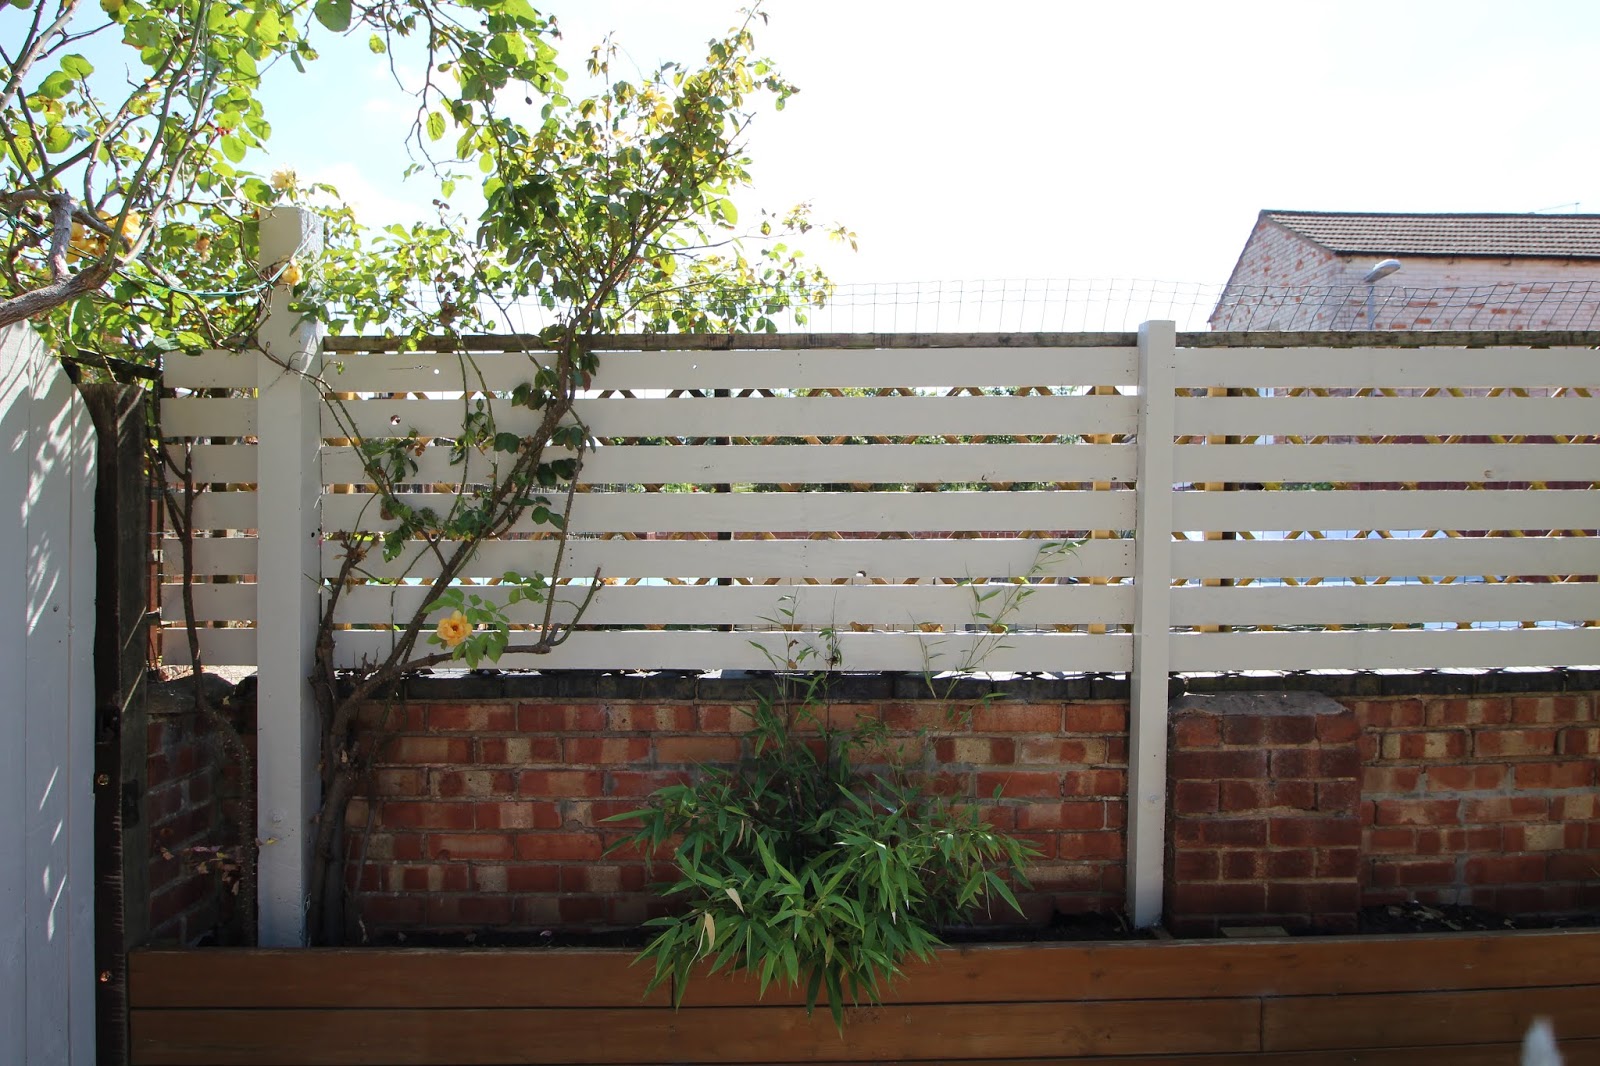
// (adsbygoogle = window.adsbygoogle || []).push({}); // And Incase You've forgotten what it looked like before. Here's a Before & After! 

Unless you have a trellis too, your slats will sit on-top of fence posts, so they should run almost seamlessly across the wall. Which is generally how most slat fences appear, and I think probably looks a bit better. We chose to do ours onto the trellis, mainly because our fence posts were of varying thicknesses - it just wouldn't have worked so well.
But, what do you reckon? A good alternative to real fencing? If you can stock up on free pallets - I think this DIY would be incredibly worthwhile for the amount of money you could save! And I think it looks pretty decent too. But obviously, I might be a tad biased ??
Total Costs
(rounded to the nearest pound)
New Tools Purchased:
None
Materials Used:
Fence Post & Treated Timber - £23
Masonry Bolts (10pack) - £8
Pallet Wood - £20
Nails - £5
Paint - £13
Total: £69
from http://www.kezzabeth.co.uk/2018/07/diy-slat-fence-with-pallet-wood.html 
After months and months, I'm finally sharing our DIY Scaffold Board Decking. Yep, it's been a while and I've had quite a few questions about when this post was coming - sorry, I've been such a bad blogger recently! We actually started building this at the end of summer last year (yikes!) and finished it up earlier in Spring this year. But then with travel and other commitments, it's taken me quite a while to get this post properly written. So as I say, I've had lots of questions about how we built our scaffold board decking, so I thought it was about time I wrote this DIY down! As a quick reminder, here's what we were dealing with pre-decking, this time last year. 
#GardenGoals right? We had sloped paving slabs in front of the conservatory, then a large L-shaped area of concrete and a small section of soil in front of that - It was basically a mishmash of everything and anything. Needless to say, it didn't look very appealing. The step into the kitchen (through the french doors) was also a little over 1ft high which our eldest dog was struggling to use. And on top of that, there's a drain cover right beneath the door, which meant we couldn't build a step there. The step issue, in particular, is one of the main reasons decking appealed to me, as it meant we could easily raise the deck up to provide an almost seamless transition between the inside floor and outside floor. And not to mention, it would hide the unsightly drain cover too, but still, give us access in the future. I also quite like decking for its modern look and I also planned to use the space underneath the decking as storage too. You guys know I'm all about that storage space! It seemed like a win win, so we went ahead with it. Why Scaffold Boards?So why scaffold boards over normal decking boards, you ask? Well, cost played the most important role here. With value decking boards costing upwards of £5 for a 2.4m length, my calculations led to me to believe we'd be spending considerable 3-figures on the amount we would need. Used scaffold boards are much cheaper priced per meter, and they're much wider too which would mean we would need fewer boards. They're also much thicker, which meant we could get away with using less wood within the frame. And less wood all round means less money. Plus, I really liked the look of them!So if you're interested in finding out how it's all built and how much it cost, then here's all in the info you need. Step 1 - Prepare the AreaThere are two main types of decking, one that sits straight onto the ground, the other is raised. Depending on how high you want your decking to be, and whether the ground is sloped or not, will usually depend on which route you take. The easier option is building it straight onto the ground, and for this, you would need to level the ground first.We're building ours as a mixture of both - slightly raised at the front, but sat onto the ground at the back (ever awkward here). This meant we needed to remove the sloping slabs near the conservatory and shift some sand/rubble beneath it so that the ground would be lowered enough, to provide a seamless step from the conservatory onto the decking, rather than a step-up. 

Step 2 - Laying Landscaping FabricIf you're building decking on top of soil or cracked concrete where existing weeds grow (or may grow in the future), you'll want to lay some heavy-duty landscaping fabric down over the top. If you miss this step, you'll more than likely end up with weeds growing up in-between the gaps between boards in your decking. Weeds will take any tiny amount of light and start growth, so despite the fact you *think* light will be blocked out with decking alone, it may not be. We use this heavy-duty landscaping fabric which is much more durable to excessive wear and shouldn't break up over time, unlike normal weed fabric.This will completely block out light, but it's still permeable for any rain or water to go through, so don't worry it won't end up like a swamp under there! 
// (adsbygoogle = window.adsbygoogle || []).push({}); // Step 3 - Creating the FrameIt's really important to always use treated timber when working with any wood outside. Standard softwood timber will rot and weather very badly in a very short space of time, where-as treated timber has been specially treated for outdoor wear. So despite Scaffold boards not usually being treated (we'll get to that later!), we are using treated wood for the frame. All our wood has been purchased from Wickes, which is our go-to for most building supplies.To create the frame you want to start by making the outer shape, usually a square or rectangle to suit the shape of your decking. Ours will actually be an L-shape decking, but we're making it into two separate rectangles that join together. This just makes the whole thing a bit more manageable to move around. 


We then used coach screws to secure the lengths of timber together, simply screwing through one piece of timber into the other, to create the rectangular outer frame. We always use a set-square when fixing screws to make sure the whole frame is square and isn't going off at a wonky angle. Of course, if you're not building a square (maybe a crazy hexagon?!) then you probably won't need this. 


Ideally, you should space them evenly apart, but in our case, we've had to work around a drain cover (so we can still access it in the future) which meant they weren't quite that even. The more lengths of wood you use, the stronger the frame will be. We've gone for the bare minimum here to save on £££, however, scaffold boards are much thicker, so they need less support anyway. Normal decking boards would certainly need more than this. 
Once those timbers have been attached in the same way, you can then add some cross timbers. Again, this is all just for additional support and to make it as secure as possible against the whole frame twisting or moving in any way. 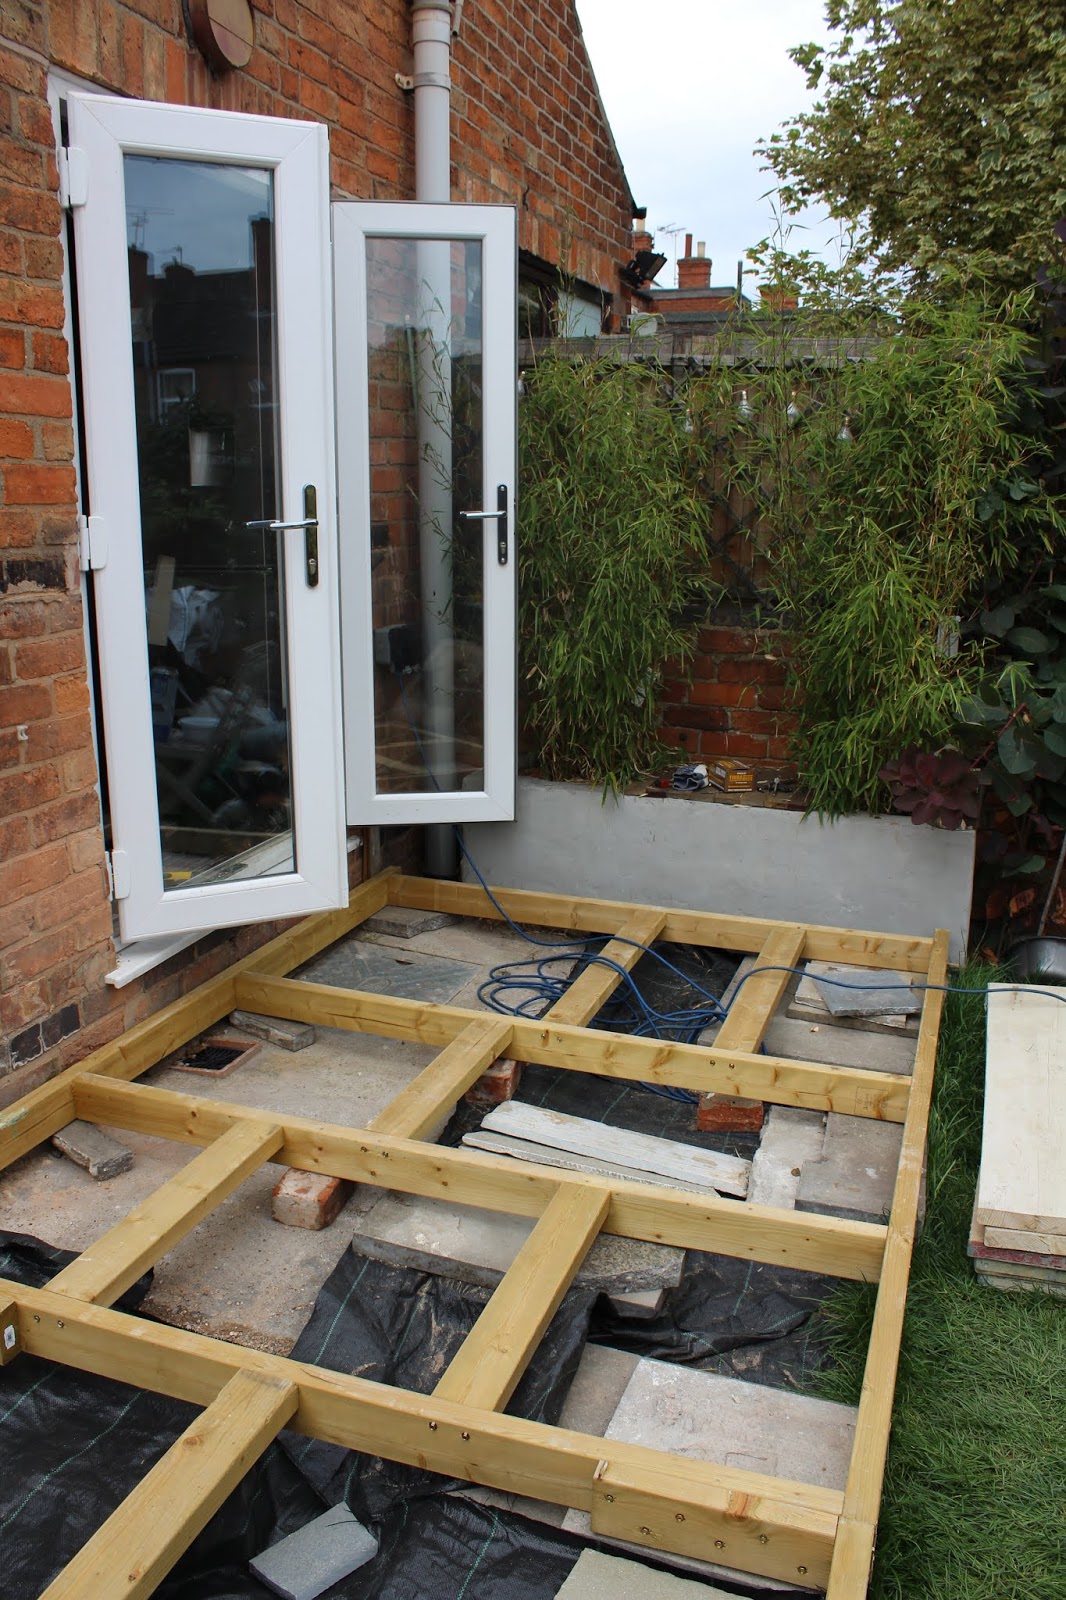
To affix both rectangular frames together (remember I said we're building an L-shape made up of two rectangular parts?) we simply adjoined them side by side with several screws to hold in place. 
How We Added Under-Decking Storage Ok, so I mentioned we planned on having some storage space underneath our decking at the beginning - specifically, we wanted space to store our large ladders. Since we don't have a shed or garage, we've had them just hanging around the garden for the last 3 years, which is kind-of unsightly and not to mention, not so great for home-security either. So the way we've done this is by having a 'break' in the frame of the decking, as it were, in which we can slot the ladders into. Kinda hard to explain, but just like this. 
This gappy section in the middle which is missing cross-timbers is where we plan on laying the ladders down. We'll then have a clever open/closing door at the front of the decking in order for them to slide in and out, so it means we don't have to go lifting up every single scaffold board every time we want to use them (which won't be very often anyway, but y'know!). Here's an example of how they will fit in.. 
Of course, you could adapt this idea for a much smaller area and use it to store garden chairs, garden tools, other random bits and bobs too - which I kind of wish we'd added a separate space to do too. It's worth remembering though, that this big void with no cross-timbers is more likely to twist and move until the scaffold boards have been laid on-top, so we did have to be extra careful until it was finished. We're confident the whole thing has been built strong enough though to not need cross-timbers here and luckily since scaffold boards are so thick and strong on their own - we can get away with fewer cross-timbers anyway. Again - another good reason for picking scaffold boards! Step 4 - Levelling the FrameWe actually simultaneously merged this step into the one above, but writing that as one giant step felt a bit too much. So I've separated it just for the purpose of being easier to read/understand, but you'll actually need to do this as the frame is being built.Building the frame is one thing, but getting it level is another. If you're building the frame straight onto the ground, then you can simply level the ground out, add gravel or compacted rubble underneath and build away. If it's a raised deck and you're building on top of soil, you will need to use wooden pillars submerged into the ground and concreted in place (think like a fence post!), which you can then fix the frame onto. If you're not sure what I mean or want to see how that's done, I recommend checking out this video. Or, if you're building on top of concrete (like us) then you can use concrete padstones to simply 'prop' the frame up. You can buy these and then mortar them onto the concrete beneath, but because we're on a budget, we're improvising with very thick paving slabs, which we're re-using from the floor in front of the conservatory. 
The way we've done this is to simply stack the paving slabs up and sit the decking frame onto it. Our concrete ground is on a slight slope, so at the back (near the conservatory) we've been able to just rest the frame onto the floor, and then we've slowly propped it up more and more towards the front of the decking. Of course, it takes a lot of going back and forth to get it right and it is a bit fiddly, but we got there in the end. We've made sure to provide as much support to every joist and timber as possible, so there are no large areas without any paving slab support underneath. It's extra important to particularly support the corners of the frame and where the Timbers have been joined together. 
In some areas, we've propped just one paving slab underneath the frame, in other areas two or three were required. And if there was still a few mm wriggle room, then we've added several plastic levelling shims wedged in-between the paving slabs to sort this out. In an ideal world, we would have mortared the slabs into place, but since we're on a reaaaaallly tight budget, we decided to save our ££ and risk it for a biscuit. You want to make sure it's solid though, there should be no wobble or movement what-so-ever - we're fairly confident ours won't be budging any time soon! 


We're one year in having finished this project now and we've have had no problems so far! And as I mentioned, we've provided a lot of support under the frame all over. The more support, the longer your decking will last and the less problems you will have. // (adsbygoogle = window.adsbygoogle || []).push({}); // Step 5 - Sourcing Scaffold BoardsOne of the most asked questions I get about this decking is, 'where did you get your scaffold boards from?!". Well, luckily you can find them online on most secondhand sites, and I found mine via Facebook Marketplace.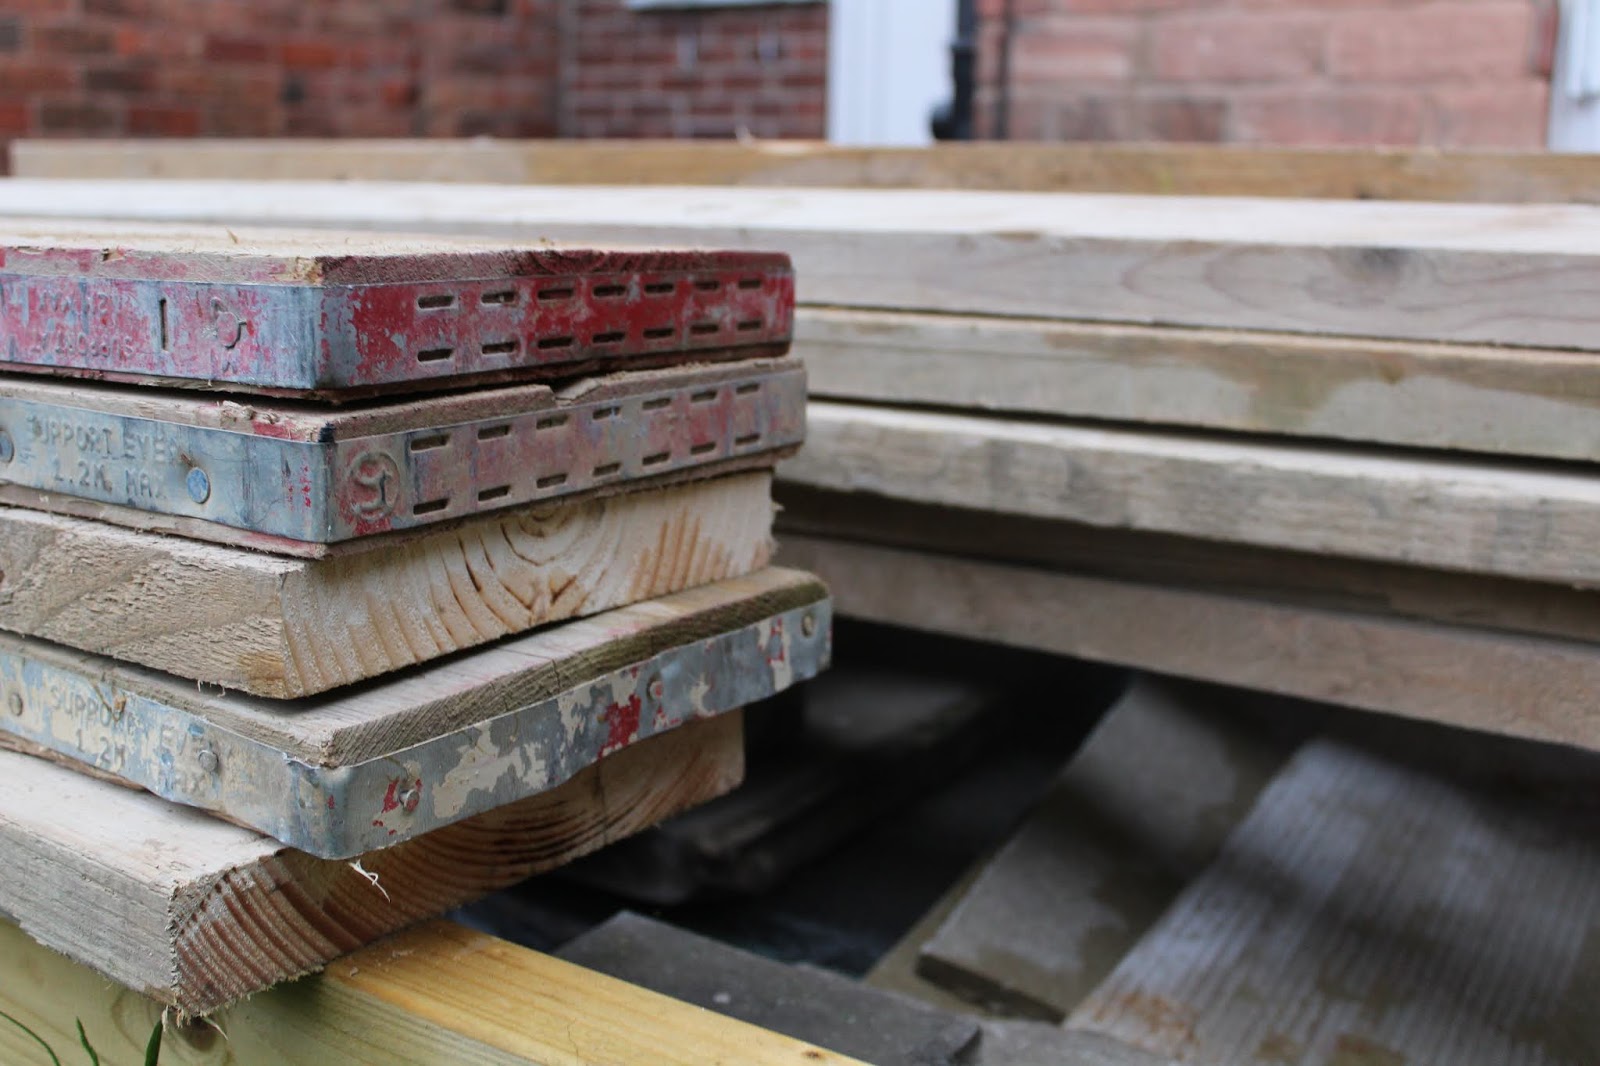
When scaffold boards are used for scaffolding purposes, they actually come with a relatively short lifespan. Any kind of defect will void their use and they'll be swapped out for new ones. The UK is keen on health and safety, so this makes perfect sense, but it also means there are a lot of old unused expired scaffold boards out there which can no longer be used. These secondhand boards are therefore relatively cheap to buy since they can't be used for scaffolding and they make the perfect budget-friendly option for decking. So ours were just £7 for one individual 13ft board. We bought a total of 20 and due to their crazy long nature, we had to take a saw to cut them all down to be able to fit into our car. Yep, we're crazy people. It took two trips and embarrassingly, we had to cut them down in a public car park. The things you do to save money eh?! 

Obviously, these are used boards, which means they do come with a used look. Some are slightly split at the end, some have saw marks in them, some even had tea stained rings, one even had a lovely splash of red paint on it. Personally I love it! But it might not be for everyone. If you don't like the used look, you can also buy new boards for more money and you can also buy new-but-defected boards, which are still not suitable for scaffolding purposes but cost a little less than new ones. If you're struggling to find anything online near you, I would perhaps try reaching out to scaffolding companies to see if they have any expired stock they're willing to sell on. Step 6 - Treating Scaffold BoardsWhilst scaffold boards are indeed used externally for scaffolding, they're not always actually treated for external use. In fact, they're usually made from a very inexpensive whitewood which won't last the test of time outdoors. Unless you're certain they're treated (and yes, you can buy treated scaffold boards!), in order to use them outside long-term, you will need to treat them. And if you don't and they're not treated, well don't expect them to hold up for nearly as long as decking would.So, in order to treat the scaffold boards, I used a Wood Treatment. Specifically, the same No-Nonsense one from Screwfix, which I used on all the cut ends too. It's not too expensive considering you get 5L worth and we've used it on other external wood in the past, which has so far held up really well. 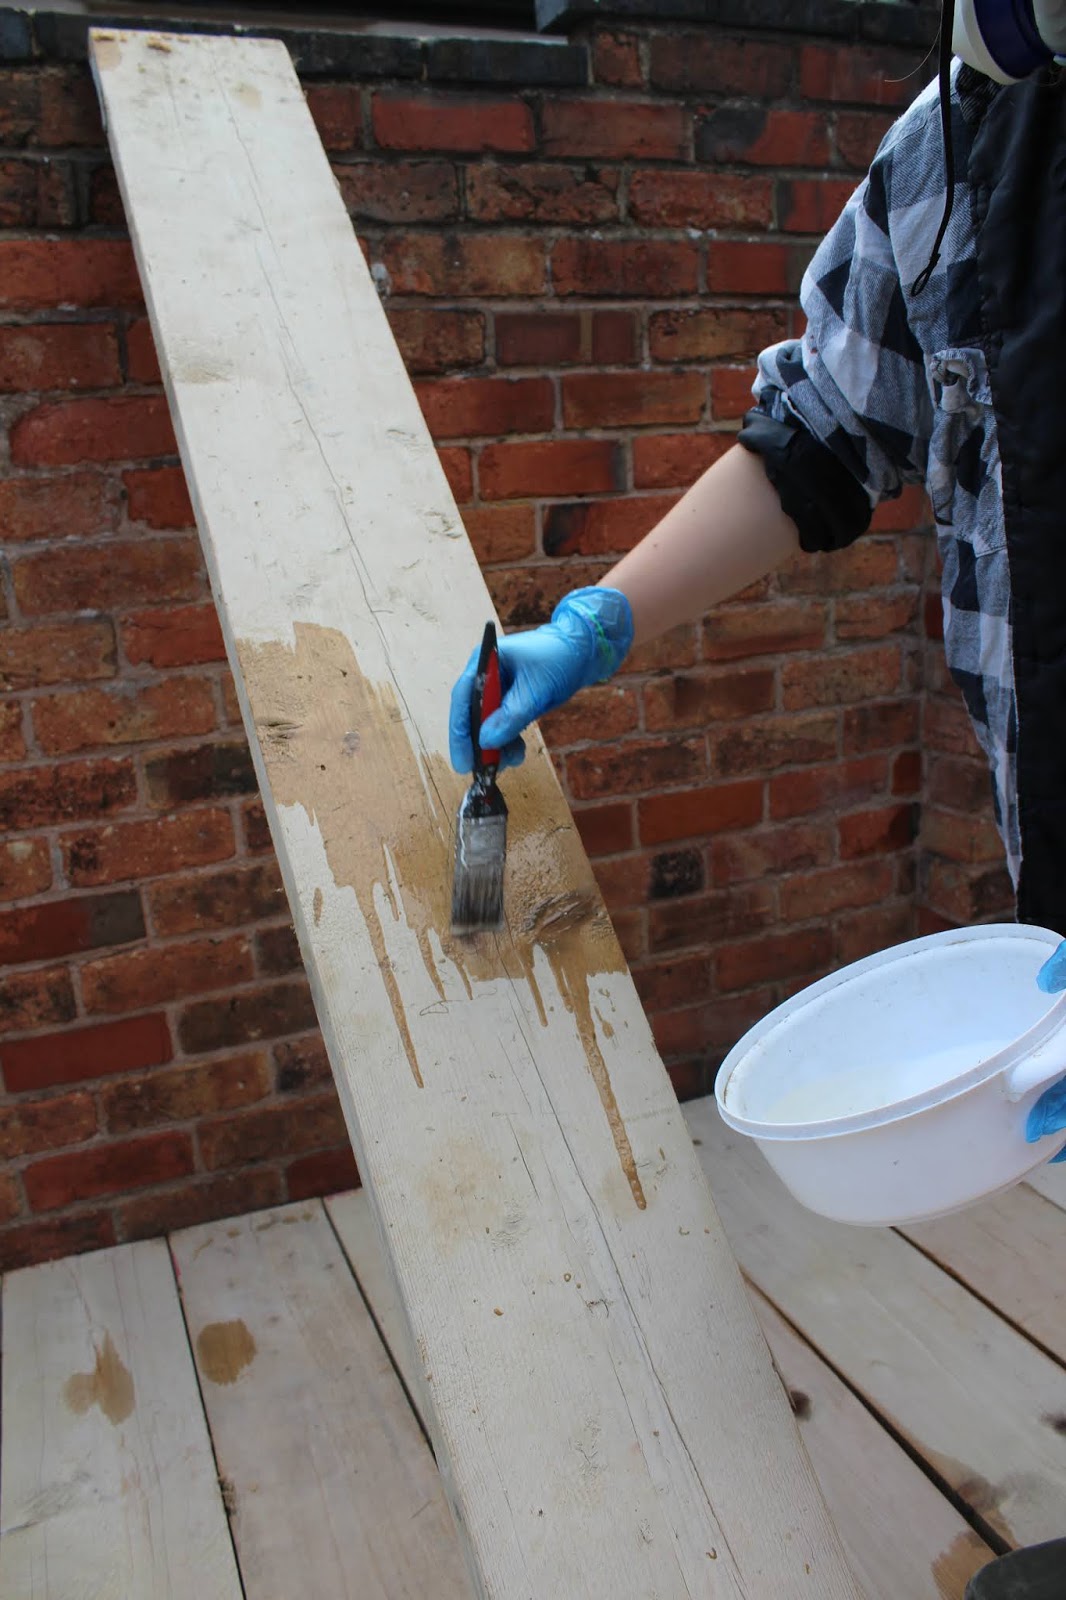
The treatment is a clear liquid which doesn't seem too dis-similar from water, except for the ponging smell that is. I applied it with a brush to all four sides of the scaffold boards, making sure to wear a suitable mask (don't breathe in those fumes!) and I did a minimum of 2 coats, with the top of the board having 3. You should be able to see water repellency working after you've finished. I actually needed two tins to do the whole of our decking, which worked out more than I had planned (eurgh!) so worth bearing in mind when you do your costings. 
// (adsbygoogle = window.adsbygoogle || []).push({}); // Step 7 - Laying and Fitting the Scaffold PlanksSeveral hours of wood-treating later, the boards were ready to lay. I had already planned the exact length of cuts we would need and how many of them we would need, so that when we crazily cut the boards in the car park, we would be prepared to have as minimal wastage as possible. Ever forward-thinking!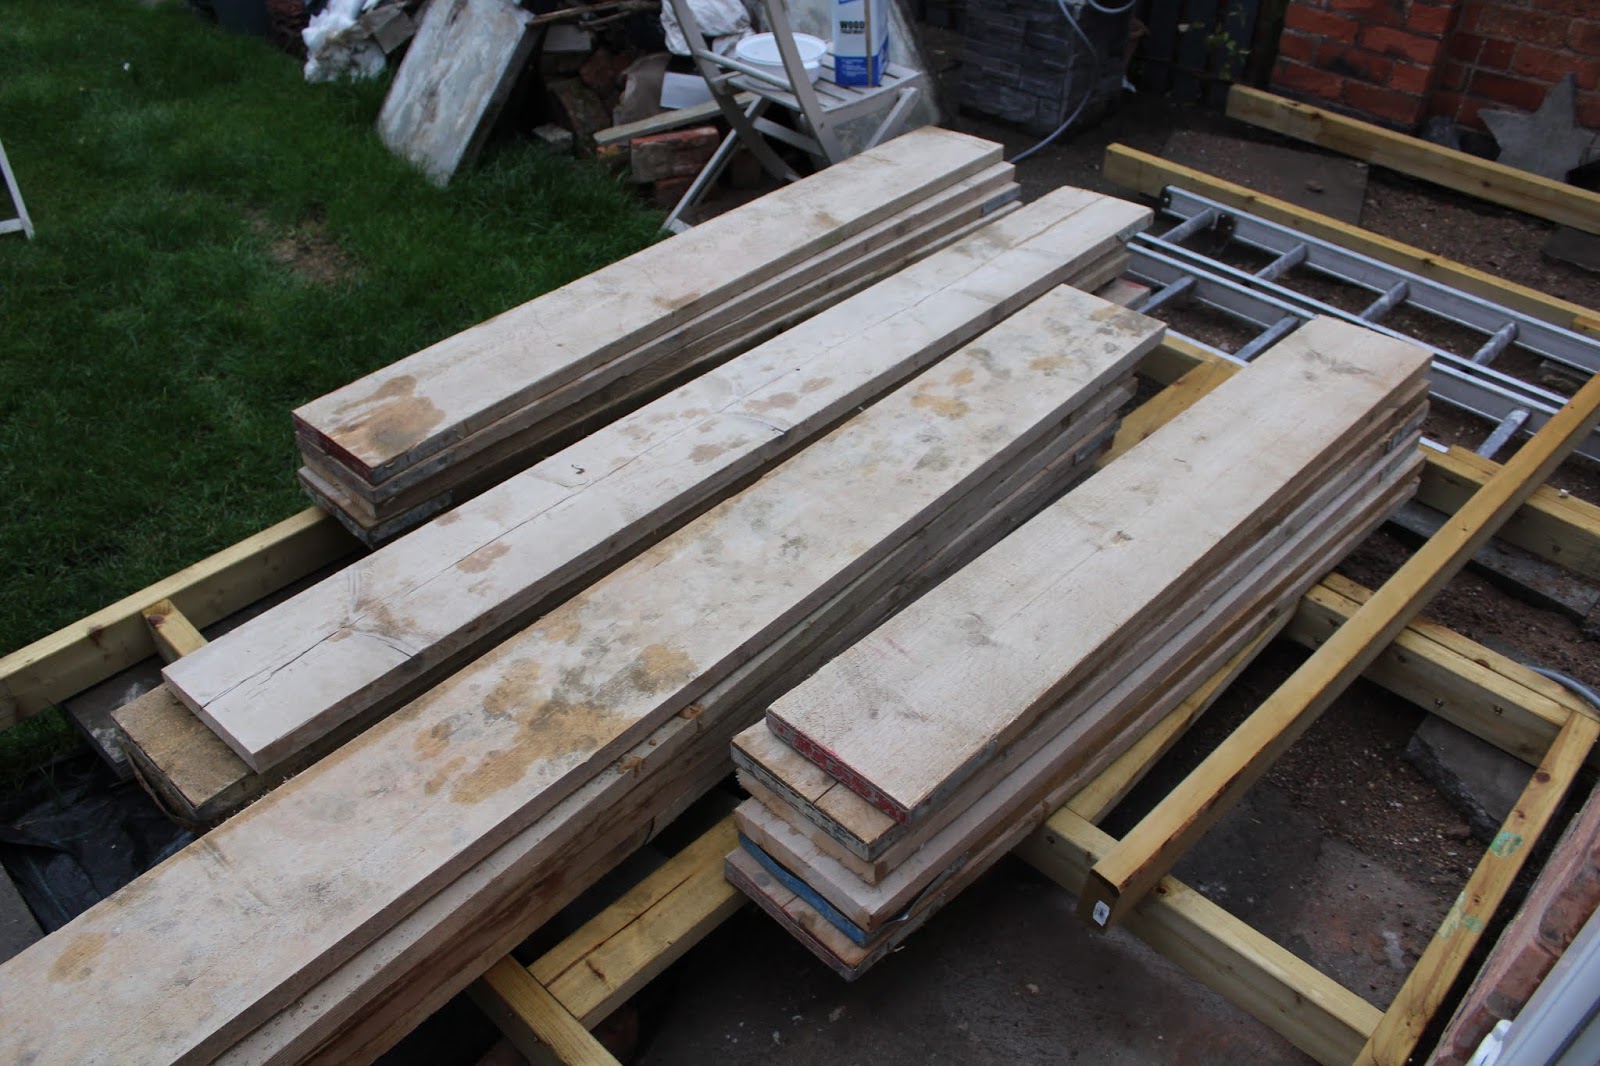
To fit them, we simply used long decking screws and screwed them down into every joist/timber available. We had to make some tricky cuts around the wall/gutter etc, which we used a jigsaw for, but other than that it was relatively straightforward and they went down within a matter of minutes. 


Step 8 - Applying a Finishing Decking OilFinally, for extra protection, I then added a finishing oil to the top of the boards as well. Not only will this provide extra protection, but it will also provide visual protection - which means I'll be able to see when it needs a top-up of oil. I used Cuprinol's Total Deck, which I had already had a tin of, although I did have to buy extra as well. Although it was fairly priced, it turned out fairly orange. Can't say I love it visually, but it has so far done a good job of treating the boards.

A few people have asked whether I sanded boards as well - and the answer is no, I didn't. I was worried that if I did sand the boards, they would have become very slippy in the wet and frosty months, which I really didn't want. These boards weren't too rough anyway and we've certainly had no problems with splinters (and yes I do walk on it bare-footed!) so I personally wouldn't bother, unless you think it needs it. Step 9 - Adding a Hinged DoorYou're probably wondering how I'm going to access the ladders beneath the decking? Well, I'm adding a hinged door on the front, which will lift up and allow me to slide the ladders in and out. To do this, I simply added flush hinges and drilled a small hole into the board to act as a handle. Nothing more, nothing less. It simple and it works.

// (adsbygoogle = window.adsbygoogle || []).push({}); // Step 10 - Finishing TouchesTo finish off, I've added a little flower bed in front of the decking, with a little step in-line with the french doors. The step is again made from scaffold boards and I've set it on top of gravel so that it's not in direct contact with the wet ground.

I think the flower bed provides a softer transition between the decking and the grass and I've re-used some old Victorian edging tiles and some black bricks to do this. They're simply just wedged neatly into the ground, which is how I originally found them when we moved in. And then I've planted some French Lavender for a bit of colour. 

I've also added a built-in Belfast sink, which is fully functioning with all the waste plumbing hidden beneath the decking. We plan on using this to wash the dogs, clean stuff we don't want to clean in the kitchen sink (you know what I mean!) and even perhaps provide a little 'potting area'. I might do a separate post on this, but I definitely recommend if your garden is a working-style kinda garden. 
// (adsbygoogle = window.adsbygoogle || []).push({}); // Step 11 - Enjoy!And that's it, you can now enjoy your lovely new scaffold decking. You will need to visually check for any signs of wear that suggest you need to reapply the treatment in order to keep it all in good condition and free from degrading - But generally speaking, this is standard for most outdoor wood anyway. Here's a finished look at how it all turned out!


So that's it! I know no-one likes a bragger, but it looks good right?! I'm personally really pleased we went for scaffold boards. I love the rustic finish and my bank account is also thanking me for it. Well kinda, it was still fairly pricey - but maybe I'm just a tad unrealistic with my hopes? What do you think of our scaffold decking? Is it a material you would use in your garden?! Total Costs:(rounded to the nearest pound)New Tools Purchased: None Materials Used: Scaffold Boards (20 total) - £140 Treated Timber for Frame (15 total) - £104 Landscaping Fabric - £20 Coach Screws - £7 Decking Screws - £12 Wood Treatment x2 - £50 Decking Oil - £30 Hinges - £2 Plastic Shims - Free from previous jobs Paving Slabs for levelling - Free, Re-used from the garden Total: £365 (our decking is approx 15m squared to put this figure into perspective if you're looking to do similar!) from http://www.kezzabeth.co.uk/2018/07/how-to-build-decking-with-scaffold-boards-diy.html 
It's been a while since I properly updated the blog on some of our DIY and renovations - and that's because we've been working away from our home, in another home. Yep, we're doing bits and bobs for someone else's renovation; Grant's parents renovation. Actually, I'm not sure I can call it a renovation just yet, but as I mentioned a while back, we'll be tackling their kitchen later this year - and in order to do so, we needed to sort a few smaller areas of their home first. With the first job being the old boiler room.
Last year, we started prepping for this and organised for their boiler to be replaced and moved upstairs, which became an essential after their water tank collapsed; and we also organised their dodgy sliding door to be replaced at the same time. With those two expensive bits out the way, we took a bit of a break and have since been planning the rest of the work that needs doing. Now it's getting warmer again, we're back on the project, DIYing and turning a cupboard (the old boiler cupboard!) into a pantry.

This is the cupboard I'm talking about. It sits right behind a wall in the kitchen and is incredibly narrow at just 80cm wide and around 2m long. From the outside it's an 'extension' to the kitchen; although actually, the kitchen is the extension to it. We think it may have perhaps been an old coal storage room, or even an outside loo. We're not sure, but it's separate to the kitchen, has a lower independent roof and is shorter is length - it's not something that could have easily been knocked through into the kitchen and since budgets are slim, we're doing a more 'mend and make do' project rather than re-design and re-build. It's location in the kitchen makes it the perfect room to become a pantry!


{The Plan}So Grants parents didn't really a plan or design they wanted from the room, just 'something with character' was their input. I really wanted the room to feel more spacious, be practical, offer a ton of storage space but at the same time appear organised, look pretty and hopefully convince Grants parents to de-clutter a little (they have a lot of stuff!). My plan was to include painted panelling, a patterned floor and rustic shelves. Three simple materials that would hopefully add bags of style and character to this room.{Repairing Brickwork}The room had been covered in some kind of old manky boarding, which was barely attached with just a helping of nails. The ceiling had begun to fall down, the floor was just muck, it was dark, gloomy and did not feel like a 'room' at all. We set about ripping everything out to see exactly what we were dealing with.


Turns out there were missing bricks (quite a few of them!), some seriously shoddy mortar work, roof beams on the wonk and a floor that looked almost burnt by the boiler that had once been on it. 
We started by filling in the brickwork with new bricks (luckily there was plenty hanging about in their garden) and we also heightened the brickwork on the end wall so that it covered across the multiple vents at the top. Why that wall was only half bricked up, I don't know - but those vents were creating a major breeze and were only there for the purpose of the boiler, which had now gone. We'll probably need to remove them eventually, but we can do that at a later date from the outside. Here's a before and after: 

{Plasterboard & Plastering}As I mentioned, a part of my design involved use some mid-height panelling, so to save on plasterboard, we only plastered the top part of the wall and the ceiling. Grant fitted the boards and plastered it himself - I've written in detail about he learnt to DIY plastering before, so you can check that post out here if you want - It wasn't the most straightforward job as you can see we had some pipes to box around and quite a few angles to cut thanks to the sloping roof, but he did a really good job with it!


{Panelling}To affix the panelling, we attached batons across the wall horizontally, which would be the fixing point for us to nail the panelling into. For the most part we were able to reuse the timber we had originally ripped out of this room; so only had to buy a few extra lengths. As well as horizontal batons, we also attached a few vertical ones too. These were strategically placed so that when it comes to fitting the shelf brackets, we can screw right into them without the faff of wall plugs.

We made sure the batons were deep enough to recess the pipe into, so that it would be hidden underneath the panelling. The only exception is the kitchen wall, where the pipe just stuck out far too much. With a bit of paint though, we thought it would look fine and blend in unnoticed. We made sure to take measurements of where the gas pipe is located so that there wont be any drilling accidents in the future. 
On the opposite side where the pipes from the old boiler were, we created a corner boxing. Annoyingly the pipes stuck out the wall quite a bit, so a triangular boxing seemed the best way to take up as little space as possible. It was much harder to do than a simple square boxing, but I think looks much better this way. 
We then nailed the panelling into the batons, in the same way I had done previously in this post. This is actually the exact same panelling I used in our conservatory seating, just a taller version (1.8m). It's from B&Q (found here) and cost £12 per pack of 10. We needed 5 for this space, but I always recommend buying one pack extra because you do get a few imperfect planks per pack. 


The nails were sunken into the panelling, poly-filled over, sanded and then I painted it in Valspar Premium v700 blend wood paint, colour-matched to Lamp Room Grey, which will also be the colour of the kitchen eventually. I really like Valspar paint, especially their wood paints (I actually prefer these to any other brand I've tried!) and it's perfect for a kitchen, because it's easy to wash and scrub down, which is pretty vital when food is involved - and it doesn't stain too! We added a top trim to finish it off, and left this raw. Oh and the walls are just plain trade paint white. 


{Flooring}So, onto the flooring! I mentioned patterned tiles were going to be one of the main features in this room and you might have seen a glimpse of them already - they are some absolutely beautiful and simple Laura Ashley tiles. They're patterned, but not an in-your-face kind of pattern or a make-your-eyes-go-crazy kinda pattern. Just simple and pleasing on the eye. Being Laura Ashley though, they did come at a bit of a price-tag, but for such a small room I thought it was worth it (and not too drastic!).
DIY tiling is something I've now done many many times, and I still haven't written a full how-to post yet, can you believe? It's on the agenda though! I'm not going to do one here or this post will be about 100,000 words long. BUT I'll show you a little bit of how it's done. 
So the guys at Vitrex did very kindly gift me a bunch of tiling tools for this project - some of which were new replacements for Vitrex tools we already owned and some were upgrades. Vitrex basically make everything you need when it comes to tiling; Ffom cutters, to sponges, to spacers, grout smoothers, the whole shebang. Because we're using ceramic tiles and this room is pretty square, a manual cutter is all we needed to cut the tiles (if you have particularly complex cuts or are using natural stone, you'll need a wet tile cutter!). I did a dry-fit first, which means cutting everything before you affix it down. I have to say, having a new decent manual tile cutter made this job SO much easier - and I can definitely recommend this one. 

I spend the adhesive across the floor, setting the tiles on-top, making sure they're level (if you've used self-levelling first as we've done this should be fairly easily, otherwise you can use some levelling spacers to help) and you want to make sure the tile has full contact with the adhesive as well. 

Once it had dried overnight I went on with the grout. We decided go for a light grey coloured grout to almost match the tiles - the one we actually used was Mapei in 'Ash Grey' which I picked after demanding to see every packet of grout in Screwfix so I could compare greys, ha! Luckily I'm a regular there, so my excessive DIY spending probably kept them sweet ;) I'm really glad with my pick though, I think it's the perfect colour! 


{Rustic Shelving}
So in order to save money, we wanted to use reclaimed wood to make the shelves. Pine furniture board is seriously expensive and MDF is even more so. We live near(ish) to a farm that sells 2m pallet planks for 70p, so I managed to pick up 15 for under £11 and that was all I needed to shelf-up the whole room. Can you get more affordable than that?!
However, of course the downside of saving money on reclaimed wood is that you do in fact need to spend A LOT of time sanding it back (muddy was not the look I was going for) and de-nailing it. It took me about 3 hours in total to sand all 15 planks to 'rustic perfection'. I used my new random orbital sander, starting off with a coarse 50 grit and then finishing with a 120 grit. In the end, all the planks looked really good! Some are a little more rough and ready than others, but they all have their own invidividual character to them - and Grants parents did say they wanted character right?! ;)

As for the shelf brackets, Grant DIYed those himself from some simple planed timber, that cost £1.60 a length. We used 3 of those, so bagged 12 DIY-made brackets for just a little over £4! To buy these new would have cost us £24 at the cheapest place I could find. You can see why we DIY stuff when you look at those kind of savings!! It also allowed us to make them to our own bespoke size too, which was essential for this narrow room. I'm going to do a DIY bracket tutorial separately I think, or this will be one very long post. But here's a little sneaky peak, so you can get the gist of how they're made.

When it came to putting everything together - it was pretty simple. Thanks to the fact we'd carefully measured and planned the location of the brackets way back when we did the batons, we could simply screw everything straight through the panelling and into those. We'd left little markers on the panelling too - so we knew where everything was. We planned for 4 shelves, each with 3 brackets. We've kept the shelves quite slim (around 16cm deep) so that it's still easy to manoeuvre in this already narrow room.


At the end of the cupboard, we'd planned deeper shelves to be supported with planed timber running around the wall. It means these shelves will be much stronger. Again, we'd already attached batons in the right locations so we could also screw these straight into place too. 

{Finishing Touches}This room originally had a wall light (it was just a lightbulb with a makeshift fitting) but because it's so narrow, I just didn't feel it was working. All the best designs I looked at stuck out far too much and I didn't think it would really light the space sufficiently. We couldn't change the wiring, so instead I decided to buy a regular ceiling light with a long length cable and attach it up to the ceiling with a hook. It actually works really well and I think just adds to the quirkiness of this room! The light is from eBay (found here) it's quite similar to ours in the kitchen at home, but with a brushed metal shade and it's the perfect size for this room!

Looking pretty different right?! We finally added a little ledge to that corner boxing, attached some skirting and VOILA, room done.


{A Final Look}OK, so I feel like this is becoming a very long post. Thankfully, we're at the end! After six weeks off on/off work, it's DONE. Well, we actually have a door (and door trim) to potentially attach at some point. And there's one small piece of wood missing along that little ledge. But hey, I'm calling it done. Those things can wait, right?!It's an incredibly difficult room to photograph, so I haven't been able to use my DSLR camera because the lens is too zoomed in (yep, I'm not pro enough to have multiple lenses!) so apologies for the iPhone pics, but hopefully you get the idea. It's obviously not our house, so I haven't 'styled' the shelves, nor have I properly added food - that's something they'll have to figure out over time (pretty labelled jars would totally be my go-to!) but I think it looks blooming' amazing and so freaking different to the 'before'! 


I think it's definitely got character - in fact, tons of it! I think the floor and wall panelling combo works SO well and I'm actually incredibly jealous this isn't in my house right now. So that's how we turned an old ugly cupboard into a Pantry. I love it and I think Grants parents are pretty pleased too. It's such a better use of space and I'm certain will fit everything they need and more in there. So, what do you think? Fancy turning one of your cupboards into a pantry?
Total Costs
(rounded to the nearest pound)
New Tools Purchased:
None
Materials Used:
Panelling (B&Q) £70
Tiles (Laura Ashley, Homebase) £60
Screws £5
Plasterboard £30
Mortar £10
Plaster £5
Timber for Batons £10
Nails £5
Self-Levelling £30
Tile Adhesive £13
Grout (Ash Grey, Screwfix) £8
Timber for all Brackets/Shelf Support £13
Skirting £20
Pallet Planks £11
Light Fitting (eBay) £26
Total: £316
with materials to spare
*Both the Valspar paint and Vitrex Tiling tools were sent to me for review and feature within this makeover. I only ever recommend products I would genuinely buy and all words and opinions in this post are my own. Thank you for supporting the brands who support this blog!
from http://www.kezzabeth.co.uk/2018/05/turning-cupboard-into-pantry-diy.html 
I haven't done a living room update in quite a while; truth be told, we've had to put it on hold a little bit, due to a few different reasons. BUT, I'm back sharing a small update today - a new fancy electronic window blind! Yep, it's a blind that works totally on its own, via the power of a remote control!
So this post is in collaboration with Order Electric Blinds who sell a whole range of made-to-measure electric blinds, from roller blinds to venetian blinds to roman blinds. I've been really interested about electric blinds for quite while and we've actually contemplated the idea for our out-of-reach roof windows. However with our living room being the room we're tackling at the moment, coupled with the fact we've had ZERO window coverings for the last few months and our dogs bark at every single person who walks past the window (help me!!), I thought this room would be the best place to feature one.

Since we already have quite a few features in this room, such as our gorgeous feature wallpaper (check it out here) and beautiful arched fireplace (see here), I didn't want to add any visually dominating fabrics to the mix. I think the period panelled casing around the window is actually stunning on its own, and to add a patterned or feature window covering, would in my opinion have taken away from that. So, instead I decided on a plain white roller blind. I think it looks sophisticated, simple and chic. It adds to the gorgeous period style window and doesn't take away from it.

It looks a little more grey in these photos, but I promise you - it is actually white! The blind is a full black-out blind which makes it absolutely perfect for this room (have you ever tried to watch TV with the sun beaming onto it? Yeah, not good). It feels really cosy in the evenings now and gives full privacy - which we've been lacking for SO LONG. And I haven't even mentioned the best feature about it yet, have I? It's electronic!

Yep. It means you don't ever need to get up and adjust the blind manually, a simple switch on a remote does the whole thing for you. It's absolutely brilliant. I mean, it makes me even more lazy than I already am, sure - But if you're snuggled up with sleeping kids (or in my case, dogs!) it means you don't have to disturb them to close the window. If you have furniture in front of the window, there's no more struggling to reach the pull chord. And you can take a step back and decide exactly how high you want the blind to be, without going back and forth for that perfect position. Here's a little boomerang of it in action ;)
The blind is powered by Somfy, who are world-leaders in motors and controls within the home. There's a 5 year guarantee on all their products and there's also a few different power sources to choose from. The easiest and most convenient for us was a simple battery operated blind. There's a small battery pack connected to the blind which can easily be tucked away behind the top roller part of the blind, so you literally wouldn't even know it was there. The lack of wires means you can't tell it's electric without knowing, there's no need for an electrician and it doesn't matter if your window isn't near a power supply either! It's simple, DIYable and it works. In terms of pricing, this blind (around 1mx2m) cost around £100 - but obviously this is determined on blind size, so I recommend checking out their side for an accurate quote of your own. 
I always wondered if electronic blinds were a bit gimmicky, and in a way they might be. BUT I do think they're also really practical as well. You can buy a separate timer remote which allows you to programme when you'd like the blind to lift up and lift down each day. It's perfect for when you're away if you want to simulate the effect of someone being home, OR even just so you don't have to come home and close every single blind manually in the winter months. 
And if you're really into your gadgets and smart-home kind of lifestyle, you can even connect the blind to a separate TaHoma System, which can then be used with certain Smart Home Hubs like the Amazon Alexa. It's not something we personally have - but I know there is a huge growing market for these kind of things! So here's a final look at the blind in its fully closed position. We still have a bit of work to do to in relation to the window frame (I don't know if you noticed a part of the sill that needs replacing?!) and we also discovered an original victorian window shutter which we hope to restore. But we love the idea of using both our new electric blind and original shutters together - and because our frame is so deep, it should also be possible! But you'll see all of that soon enough. I'm super pleased with this new electric blind and I have to say - I may even be thinking about some for future rooms too! 
What are your thoughts on electric blinds? Are you intrigued by them or they a bit too much for you? *The blind featured in this post was sent to me to review. All words, thoughts and opinions are my own. Thank you for supporting the brands who support this blog! from http://www.kezzabeth.co.uk/2018/04/somfy-electric-blind-review.html |

AuthorHi I am Jaclyn Ross 28 years old and I am a project manager for a construction company we install basements and do central ac as well as insulation. ArchivesCategories |
 RSS Feed
